
Get more details about this project
What you need
1 LP vinyl record
Scissors or blade
Oven mitts
Oven tray
aluminum foil
Black elastic
Instructions
Take your record and place it onto the oven tray and slide it into the hot oven. It will only take a few minutes for the record to become soft and flexible. Using your oven mitts take the record out as soon as it looks soft. It will start to droop and deform when it is becoming soft, that is when it is ready to work with.
For the headband you will need to cut the record in half, you will do this when it is soft, either with a blade or scissors. You will need to work quickly as it will begin to re-harden, you can place it back into the oven to soften again at any time.
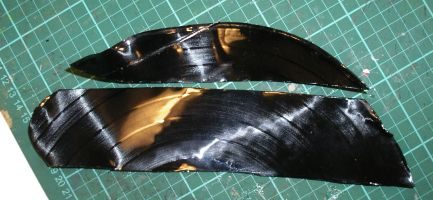
Once you have cut the album in half, place it back into the oven and soften it again. This time you will cut a wide band around 2 inch wide for the width of the headband.
Once you are happy with the width place it back into the oven to soften the edges. Do not let it get too soft or you may loose the flat shape.
Once it has softened the edges you need to take it out and cut the ends to remove any sharp edges. A rounded finish works best. You may need to pop it back into the oven several times to get the desired shape you want. Remember don’t let it melt too much at this point or you will loose your creation.
Once you are happy with the general shape, place it back into the oven to soften slightly pull it out and once it is cool enough to touch place it around your head and press firmly. This will custom shape the headband to your head so that it sits comfortably.
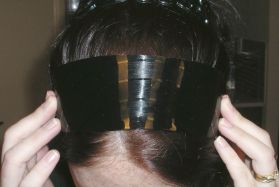
Next take a hot knitting needle or metal skewer and piece a hole at either end. This is for your elastic. If you have any sharp edges you can use a fine sandpaper or emery board to smooth over the edges once it is set. Tie your elastic into either hole,the length of your elastic will depend on your head size.


I just hope this was a really crappy album.
I hate to think people are destroying really awesome classic albums.
But it did end up being pretty cute!
For the person who commented about wanting a different color, you could paint it.
Oh, this is so awesome, it’s a GREAT way for someone to show their love of music, and an awesome DIY vintage project!
I have a couple super scratched up records lying around, I think I’ll try it out! One could potentially make 2 headbands, from the two halves. I think I might use the left overs to make a bracelet or something, very cool!
simply, funky, and totally unique!!! Love it!!!
this is cute im going to try to make a cuff/bangle instead
i dont like this idea but if it was a purse id give it a million stars!
Very cute. A great way to make something new out of something old.
There is no pattern required it is just a rectangle with rounded corners
great idea, would like a pattern to follow for the shape.
very clever & creative
I wish it was like a different color, like a red record..or a BLUE record!