
Get more details about this project
What you need
1 small cardboard box
Printed paper (bricks)
Instant paper mache’ mixture
1 Egg shaped styrofoam ball
1 Round Styrofoam ball-(cut in 1/2)
Wooden dowel
Craft paints – red, white, blue, flesh, black
Can of spray paint-red
Raw wool, or rabbit fur, yarn, for beard and hair
Cotton batting ( spray painted red)
Sandpaper
Thick white glue
Instructions
Prepare the box –
Paint the box outside of box cover, white. If not lining the inside of box with tissue paper, paint that also. Remember that the outside of the box will be covered with the bricks paper so no need to paint where that will be.
Cover the outside of box with brick paper and set aside.
Styrofoam ball –
Cut the round ball in half with a sharp knife, this will be Santa’s shoulders. Set aside.
The Styrofoam egg will be his head.
Prepare instant paper mache’ according to directions on package.
Insert a 6″ dowel or skewer into bottom of egg shaped head and glue in place. Let dry.
Hint: I use a small bud vase to hold the head while working on it and for holding it while drying.
Completely cover head (egg) with pre-mixed pulp and let dry completely. After the first layer of pulp is completely dry, add more pulp to the face to build up eyebrows, nose, cheeks and chin. Let dry again completely before painting, (paper pulp may take days to dry, so try not to make it too thick)
Hint: push firmly on paper pulp, it should not sink in if completely dry.
Add painted features, flesh skin, white eyebrows, eyes, using colors blue, black pupils and black outline. When head and face are completed painted and dried, measure and cut wooden dowel long enough to push into rounded side of Styrofoam ball. Glue Santa’s shoulders and head together.
Note: Cut side of Styrofoam ball will be glued to box.
Finishing –
I use fine sandpaper to wear away some of the harsh painted features and to give it that old, worn look.
Now, you can cover Santa’s shoulders with more paper pulp or simply paint the ball.
Hint: Instead of pulp, you can glue on strips of tissue paper to cover ball. It dries faster then pulp. Paint shoulders red and slightly sand this piece to look old.
Glue Santa to the top of the box and let dry.
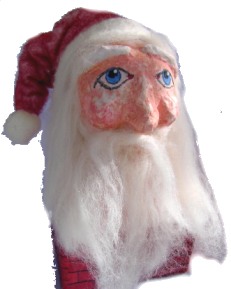
Glue on beard, hair, hat and tassel.
Santa’s hat is made from a triangle of spray painted red, cotton batting. The band of hat is just a folded strip of unpainted cotton batting that has been glued in place.
Note: Since each Santa box will be a different size, I cannot give any measurements for the hat. It will be up to you to measure his head to come up with a correct size. Enjoy.


that thing makes snata look scary!
ithink its pretty cool but not so good looking