
Get more details about this project
What you need
Standard silver wire gauge 30
Or medium fuse wire
Blue bugle beads
Silver beads
Sequins
Perforated earring disc
Fine pliers
Contact adhesive
Instructions
Very small beads are used in this type of bead work. They can be round or bugle shaped. Glittery or transparent beads and pearl beads used together look really nice.
The basic technique for making these petals can be used to make butterfly wings or leaves for larger brooches.
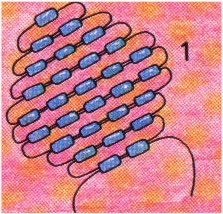
Step 1: Cut a length of wire around 18 inches long for each petal. Then Thread a single bugle bead on to the wire and slide it into the center. Push one end of the wire through two more beads. Push the other end of the wire through the same two beads. This makes the second row of the petal. Work row 3 with 3 beads in the same way and row 4 with 4 beads and row 5 has 5 beads. From this point using one bead less on each row until only one bead is used shapes the petal. Make 6 petals in the same way.
Step 2: To make the flower center cut a length of wire and slip a small bead into the center. Double the wire and pass both ends through a sequin. Push both wire ends through one of the center holes in the perforated earring disc.
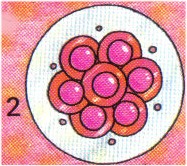
Pull the sequin and bead into position. Pass one wire end up through the next hole and push it through a sequin through a small bead and back through the sequin. Push the wire back through one of the perforated holes. Bring the wire up through the next hole and continue to thread sequins and beads until a center rosette of beads and sequins is formed.
Twist wire ends together at the back.
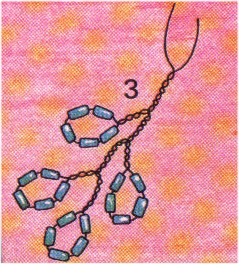
Step 3: Make 6 wire sprays How to make a simple beaded wire Spray.
To assemble the ornament, pass the two wire ends of each petal through two holes on the edge of the perforated earring disc and twist together at the back. Fix all 6 petals round the disc in the same way. Twist the ends of the sprays into one strand and push through holes in the disc so that the sprays lie behind the petals.
Pinch the petals gently with your finger and thumb to shape them realistically. Glue the disc to a hair slide or brooch back to make a wonderful fashion piece.
Perforated Earrings Discs seem to be impossible to find. I suggest making your own. Use Heavy Plastic with holes punched into it or heavy cardstock. The holes are simply there to push the wire lengths through as shown in figure 2.


I can not see the pictures
Hi Karen,
Thanks for letting us know. I have made the fix. You should be able to see the images.
At first I used bugle beads that were too long, so started over again using shorter bugle beads, and that worked out much better. Thank you for this great project!
I love this project! I am on my third flower. Doing only 6 petals looked sparse, so I created 6 more with one extra row of 6 beads across and alternated the petals. I omitted the sequins from the center, and just put tons of beads in the middle.
As a beginner, I thought this would be a pretty, yet easy, project to create. I was fine for the petals and sprays of leaves. But the center ruined my piece. I couldn’t find an earring disc, and I don’t know what one looks like. I have rigid plastic, but I don’t know what size to cut the circle, how many holes to pierce or how to make the holes all at the same distance, one from the other. Also, how do I know what size sequins to use? Help!
Gorgeous!!
Sweet
I am going to make this. It is very pretty and the instructions are clear. It will be a good learning step!
its notoo hard to make. i made one and im 11.
beautiful craft project … im going to make one for my future sister in law for her wedding day …
Beautiful!!!
real easy
this craft rocks soooooooooooooooooooooo much
Great! Tried pinning it to a clutch purse for instant evening look! Thanks!
Oh my! I looooove this! I can put it anywhere and on anything! I put it on my denim jacket and it really dressed it up in a beautiful way. Top ten<3
It looks really looks good and pretty so i’m just going to try it out…..
My favorite
luv it!
very helpfull
Very beautiful to put in your hair with a clip.
this is really pretty but kinda hard to understand and make
Beautiful
beautifull!
I love this flower!
I have to agree with the other reviewers. A lovely design and not too difficult. Also, it is easy to find the beads used, which sometimes limits the patterns you can use.
exelent i really enjoy making these
This is so beatiful!!! I might try it, I WANT TRY THIS!!!
this is absolutly gorgeous… could u show how to do miniture bunches of these??
O-M-G this is so so so pretty luv it =) XD
thank you for your free patterns my grandkids will love them they love bead work
the derections are really easy but i’d like to see how to make a beaded flower can anyone help?
it looks very pretty and easy, i might try it out!!!
Absolutely adorable!
🙂
Gorgeous!
very pretty
Very Pretty!
**************************** I LOVE IT!!!!!!!!!
What a wonderful idea
So beautifully fancy!!
Excellent instructions and a real beauty!
LLMcD
beautiful beaded craft, with easy instructions of beaded flowers
[email protected]
i am going to try this.
lovely! direction and images easy to follow
I love it. It’s really cute, and it looks easy to make. Really fits my style:)
I took some old clip ons that had discs and made this.It turned out awesome & I recycled! Thats always a plus! Easy,cheap and fun.
VERY BEAUTIFUL,EASY AND RELITIVLY CHEAP
beautiful!!!
im sitting at my computer making it right now! =]
DARLING!!!!!!!!
Easy to make.
its realy v.good
Excellent direntions, with a some what varying design elements in it. Over all a beautiful piece.
vintage!
it looks sooo cool finished!!!!
i made this for my friend and she loved it . Thanks to
you i made her happier than usual. =]
beautiful, with easy instructions
it’s beautiful