
Get more details about this project
What you need
Small Paint Cans
Polyclay/sculpey Clay
Printer
Orange, black and purple light weight Cardstock
Instructions
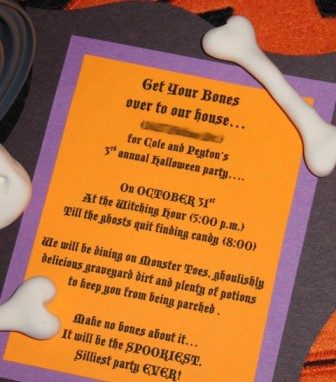
Print out your invitation onto orange card and matt it onto the black and purple cardstock.
Make sure the invite will roll up into the can and is not too big.
Using craft glue, run a line of glue around the top and bottom of the can and secure the orange card to form a new label for you can.
If you wanted you could print some halloween designs onto the can using your printer or even easier a stamp.
Just leave enough room for the address.
Pop the lid on and you are ready to send it.
You could add a stamp to the can lid as well if you wanted to.
Include this poem:
This wonderful project idea and image was contributed by Heather ( [email protected] )
Looking for another fun way to give an invitation? Check out these Party invitations that are made using a puzzle template, the invitee has to put the invitation together like a puzzle. Check out these party invitations you can buy on Amazon


this is very spooktacular, get it spook and then tackular, i crack myself up , hey im only 12, so laugh, haha
coolio
My high school aged daughter is having a party. She can make bones from clay or dough, write the party info on the bones, then collect them in a can for door prizes at her party!
Loved this, I first saw this on Craftster.org
nice project-original
Wow! This is spectacular. Thanks Heather!