
Get more details about this project
What you need
J hook – heads & body
G Hook – Muzzle, nose & eyes
4 Special Head Granny Square- Pattern Below
5 -7″ squares for body (Use your favorite pattern)
Darning Needle
Baby Crochet Yarn
Measures 21″ x 21″
Instructions
EYES:
“G” Hook – Make 2
Row 1:With black, ch 2, 6 sc in second ch from hook. (7) Finish off
Row 2: With White, 2 sc in each st. around. (14) Finish off ..
LEAVING A LONG TAIL FOR SEWING
Nose:”G” Hook LEAVE 3 FOOT STRING FOR SEWING AT -Beginning- OF NOSE.
Row 1: ch 3, 2 dc in 3rd ch from hook, ch 3 turn (3 sts)
Row 2: 2 dc in first st. , 1 dc in next st, 2 dc in last st. , ch 3 turn .( 5 sts) Row 3: 2 dc in first st, 1 in each, 2 dc in last st. Finish Off(7 sts)
Muzzle: “G” Hook SPECIAL STITCHES: Long DC (LDC)- Instead of doing a regular DC, you’ll go down about 1/2 way into the body of st of previous row and do your LDC in that st Long HDC (LHDC) – same as LDC only do the stitch with LHDC With muzzle color, ch 3, 11 dc in 3rd ch from hook, join (12 sts)
Row 1: ch 3, dc in same st. 2 dc in next dc., 3 long dc in next st. 2 dc in each of the next 2 sts. 3 dc in next st. 2 dc in each of nxt 2 sts. 3 long dc in next st. 2 dc in each of next 3 sts. Join with st st in beginning ch 3.
Row 2: ch 2, HDC in next 6 sts, 3 LHDC in next st, 1 HDC in next 2 sts, ATTACH NOSE with HDC through both Nose & Muzzle pieces , HDC in next 2 sts, 2 HDC in next st, 1 HDC in next2 sts, 3 LHDC in next st, 1 HDC in remaining sts, JOIN with sl st . Cut yarn leaving 3 foot tail for sewing later.. DO NOT WEAVE ENDS YET.
After joining top of nose to muzzle: Using long tail from tip of nose, sew a mouth for the bear.
Stitch nose on one side all the way up, work needle to other side under nose piece and stitch nose down at that side. Finish Off.
When attaching muzzle to face DO NOT STUFF.
This pattern has been deliberately designed to be used unstuffed, as preemie babies can’t have the bulging muzzles
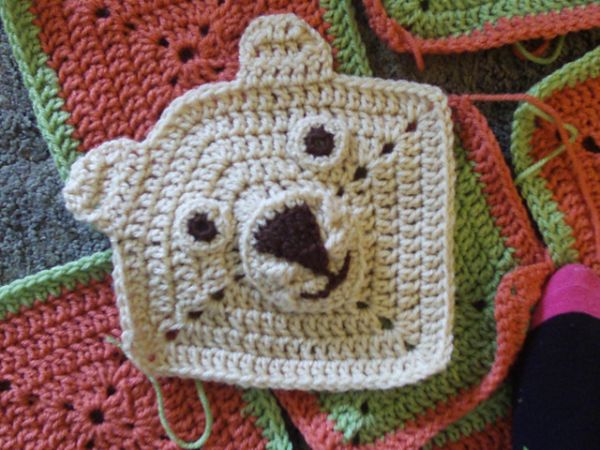
Head Grannie Square: This square is made in a slightly different to make one corner less pointed for top of the Teddy’s head.
Rnd 1: Make ring around finger with yarn. Working in ring, ch 3, 2 dc, ch 1, (3 dc, ch 1) 3 times. Join with sl st to beginning ch 3.
Rnd 2: Sl st in next 2 st, sl st in corner ch 1 sp. (Ch 3, dc, ch 2, 2 dc) in same sp. Dc in next 3 sts, (2 dc, ch 2, 2 dc) in corner sp 2 times. Dc in next 3 st, 3 dc in corner sp, dc in next 3 sts. Join with sl st in beginning ch 3.
Rnd 3: Sl st in next st, sl st into corner. (Ch 5, dc) in same sp. (Dc in next 7 st, (dc, ch 2, dc) in corner sp) 2 times. Dc in next 3 sts, 2 dc in next st, dc in next 2 sts, 3 dc in next st (corner), dc in next 2 sts, 2 dc in next st, dc in next 3 sts. Join with sl st in beginning ch 3.
Rnd 4: Sl st into corner. (Ch 3, dc, ch 2, 2 dc) in same sp. (Dc in next 9 sts, (2 dc, ch 2, 2 dc) in corner) 2 times. Dc in next 9 sts, 3 dc in next st (corner), dc in next 9 sts. Join with sl st in beginning ch 3.
Rnd 5: Sl st in next st, sl st into corner. (Ch 3, dc, ch 2, 2 dc) in same sp. (Dc in next 13 sts, (2 dc, ch 2, 2 dc) in corner) 2 times. Dc in next 12 sts, 3 dc in next st (corner), dc in next 12 sts. Join with sl st in beginning ch 3.
Rnd 6: Sl st in next st, sl st into corner. (Ch 3, dc, ch 2, 2 dc) in same sp. (Dc in next 17 sts, (2 dc, ch 2, 2 dc) in corner) 2 times. Dc in next 15 sts, 3 dc in next st (corner), dc in next 15 sts. Join with sl st in beginning ch 3. Add ears to top of bears head according to directions.
RIGHT EAR: G Hook Join with st st in 4th st to the left of top of head.
Row 1: Ch 3, dc in each of the next 6 sts. (7 sts)
Row 2: Ch 3, turn, Decrease in same st as ch 3. Dc in remaining sts until last 2, Decrease last 2 sts together. (5 sts)
Row 3: Ch 3, turn, Decrease first two sts, dc in next st, Decrease last 2 sts, finish off (3 sts)
LEFT EAR: G Hook Join with sl st in 11th st to the right of top of head.
Row 1: Ch 3, dc in each of the next 6 sts. (7 sts)
Row 2: ch 3, turn, Decrease in same st as ch 3. Dc in remaining sts until last 2 sts. Decrease last 2 sts together. (5 sts)
Row 3: Ch 3, turn, Decrease first two sts, dc in next st, Decrease last 2 sts together. FINISH OFF. (3 sts)
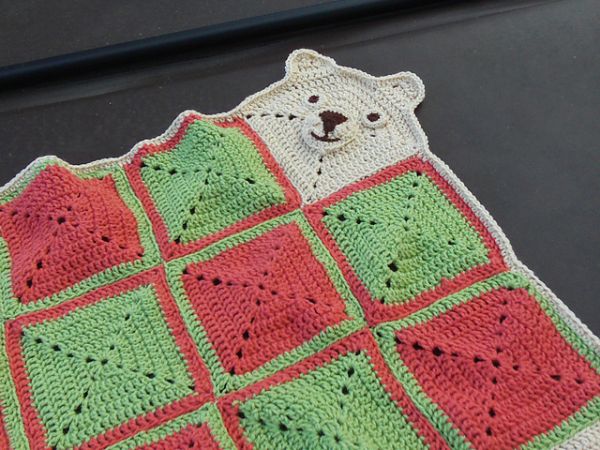
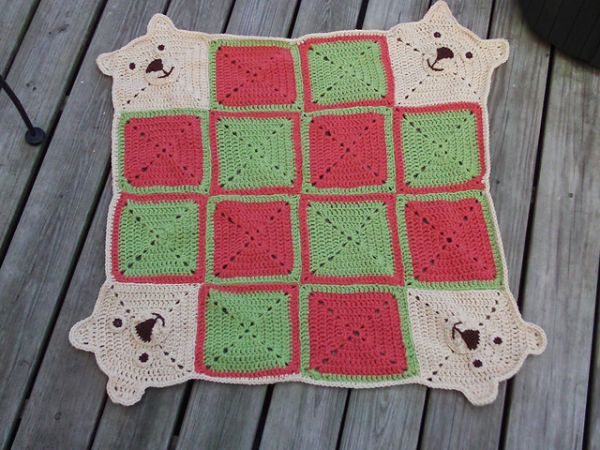
Look at photo of my Teddyghan, lay your pieces out, and start to put your Teddyghan together. Use my photo for an example of face placement.
Easy Placement – – X for body, now place each completed face square in 4 remaining space of X’s in body. ADD 2 or 3 rows of trim around Teddyghan, tuck in all tails.
~ ~ ~ ~ ~Full Size Teddy-Go-Round {Afghan}~ ~ ~ ~ ~ ~
Teddyghan for children up to maybe age 10 J Hook 12″ squares for the body, & follow “head rows” as written, (do not finish off after row 6) make changes as follows:
Rows 7, 9, & 11: (1 dc, ch 2, 1 dc) in corners, for top piece of head –
Row 7 dc 18, – Row 9 dc 24, & – Row 11 dc 27 then 3 dc on top of Teddyghans head and continue with pattern
Rows 8, 10,& 12: (2 dc, ch 2, 2dc) in corners, for top piece – Row 8 dc 21, – Row 10 dc 26, & – Row 12 dc 31 then 3 dc on top of Teddyghans head and continue with pattern.
For Muzzle: Follow directions as written Instead of hdc’s us dc and it should turn out the same. You may want to add 1 extra row of hdc around to make it a bit larger. You may need to use a small amount of stuffing
Nose: Same as written above, add 1 xtra row to pattern
Eyes: Work as pattern is written above only instead of hdc’s use dc Ears: Work as written above. use dc instead of hdc Left Ear: count 8 then start pattern Right Ear: count 18 from top then work pattern
This pattern is intended for charity and personal use only. Neither the pattern nor items made from it are to be sold. This notice must be attached to the pattern when printing it out. {“GOD” Reserves “All” (C) 2005 Rights to this pattern – “JMSQ” Feb.13th, 2005}.
The images were contributed by Guinan
![]()


So cute I love the teddy’s.
I think there is an error in this pattern. I am working on Rnd 4 of the face. In the last part of Rnd 4, it says that you are supposed to do a DC in the next 9 DC, do 3 DC in the next DC and then do a Dc in the next 9 DC. I went back and did the stitch count for the end of Rnd 3. There is a total of 17 stitches. If this Rnd is correct, then HOW am I supposed to fit 19 stitches into 17 stitches? I ripped it out at least twice before I re-counted the stitches because I couldn’t figure out what I was doing wrong! This is really frustrating! Could someone please check this part of the pattern and let me know if this is an error? Thank you!
Today is a different day. I think I got it figured out! 🙂
My husband and I have made 5 of these beauties as gifts for first time mommies. The last was for twins….a boy and a girl. Makes me feel all toasty inside when I run into these new mommies in a store and their little ones are wrapped in this adorable blankie.
Can’t wait to try it. Pattern states baby weight yarn, but how much yarn is needed for project? If anyone can give me an answer, I’d appreciate it. Thanks.
I’m into 3-D crocheting and this ranks up there with the best of them! Love it!
i made it love when i got done.
I love this
this is one of the cute est blankets I have ever seen. I make baby blankets for a church and I can’t wait to do this one. Bless you
I’ve made this in preemie & newborn sizes. I make one teddy square for head. Color can be black & white, for panda look. This pattern is fabulous and always draws compliments!
This is adorable. I will certainly make this. Thanks.
That is the cutest thing I’ve seen in a long while. I may take crocheting back up just to make one… or twenty!
can you tell us how much materials we need? thanks. I can’t wait to make it. Just a wonderful idea!!!
i think this pattern is adorable
really cute!
I love this pattern It was so cute when finished.
Waaay to kitsch.
cutest blankie i’ve ever seen!
Ah-dorable! Will probably get a giggle out of any baby or young child. Once my neice was given a gift like this and she actually attempted to ride it! Kodak moment. It’s in the family scrapbook.
I made one for my niece just on a bigger scale and she loved it !!!
Very cute…. perfect size for little ones sure to be a favorite.
I loves bears and this is very cute and adorable pattern. Ahh! Two Thumbs Up!
Very cute
Really Cute baby/ child afghan. While there are certainly other Teddy Bear blanket patterns out there, this is unique with the four corners of 3-D face. This will be loved by new parents and the children! Thank you for sharing this pattern!
This is so cute.
This is so cute.
This is so cute.
can’t wait to try this!! This will make a great shower gift!! Thanks for posting to you site for us!!!
Use a baby weighted yarn as stated in the materials
It was great. You just need to tell us what kind of yarn to use.
very cute, original, i’ve bought tan yarn to make mine. love it!
very cute, original, love it!
I really like this Teddyghan as a floor blanket for little ones! Great pattern, thanks for the rewriting!
Such an adorable pattern! I’ve made it with one head square,substituting a triangle crochet square in place of the other heads. My center squares are solid, so no little holes to catch on baby. You can make squares any size & color, too! Great pattern!
this is adorable I cant wait to try it thanks for sharing. PS I have not seen any like this in my opinion this is very original
ahhhh! Adorable 2 thumbs up! Love it! Oh and for the people who have nothing good to say about this craft zip the lip!
What an adorable pattern – I’m a knitter and wondered if anyone has converted the pattern into a knit pattern – a friend of mine has crocheted this and its gorgeous
It is beautifu and very useful
I would like to try it.
Too many out there very similar to this pattern. Not very original at all
I love it!
please let us know what kind of yarn was used on this. [email protected]
so cute and adorable
Adorable pattern