Jewelry Making - Necklaces

Swarovski Crystal Pearl and Black Velvet

How to make Swarovski Crystal Pearl and Black Velvet  - DIY Craft Project from Craftbits.com
Project rating Project rating Project rating Project rating Project rating
  • Swarovski Crystal Pearls
    Black Velvet Ribbon
    2 part epoxy glue Glue


Pearls are a HOT trend for Fall/Winter 2010! Seen in every fashion magazine from the sophisticated Women’s Wear Daily to trendy magazines like Teen Vogue.  Once only thought to be something your grandma would wear, pearls have made a BIG come back! Now seen more as classic and sophisticated, pearls are extremely easy and affordable to work with!


Swarovski Crystal pearls are a great alternative to expensive, genuine pearls.  These pearls are made with an innovative pearl coating, giving them a silky, smooth, flawless look.  Available in many amazing colors, these pearls give you the look of timeless tradition, with the option to add your personality! They are also scratch and UV ray resistant!


Below is a very simple DIY project using Swarovski Pearls:


Materials Needed For Necklaces:


  • 3- 30″ strands of knotted or unknotted (any color) Swarovski 5810 Round Pearls in 5mm or 8mm


* Pearls sold in strands


  • 4 feet and 1/4″  or 3/8″ thick black velvet ribbon


* Sold Separately


Directions:


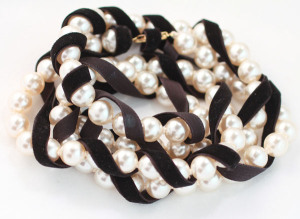
  • First twist tie the pearls together at the top to hold the necklace together temporarily.


  • Start in the middle of the strands (where it would lie the longest on your body) with the center of the ribbon and wrap the ribbon around the pearls. When you finish both sides tie a bow on top.  You can use a little glue in a few places to secure the ribbon.


Caution: do not use the clasps, just take the necklace on and off over your head


Materials for Bracelet:


1 – 30″ strand of 10mm endless pearls (any color)


5 feet in length and 3/8″ thick black velvet ribbon


Directions:


  • Starting with the middle of the length of the ribbon, wrap the pearls circling around all strands simultaneously.  Wrap pearls continuously around wrist.


Voila! Classy Sophistication!!


This project was submitted by All Things Crystal (Sarah Moniz). Thanks Sarah Moniz!

Visit http://www.merchantsoverseas.com
Leave a Comment

Star Star Star Star Star


4 4 Comments On Swarovski Crystal Pearl and Black Velvet
Avatar?d=identicon&gravatar_id=d9d42ae64a6a47dd2f52211ec7d17d6c&s=55
Guest 5 Star Rating 5 Star Rating 5 Star Rating 5 Star Rating 5 Star Rating

i like it so much. support

Avatar?d=identicon&gravatar_id=d9d42ae64a6a47dd2f52211ec7d17d6c&s=55
Guest 5 Star Rating 5 Star Rating 5 Star Rating 5 Star Rating 5 Star Rating

it is so beautiful, so classy.

Avatar?d=identicon&gravatar_id=d9d42ae64a6a47dd2f52211ec7d17d6c&s=55
Guest 5 Star Rating 5 Star Rating 5 Star Rating 5 Star Rating 5 Star Rating

beautiful. simply beautiful