
Get more details about this project
What you need
Fabric
Contrasting fabric for pockets
Sewing Machine
Velcro
Paper for pattern
Instructions
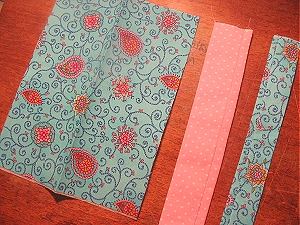
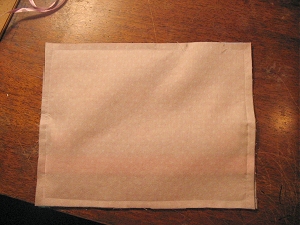
1) cut a 9″ by 7″ piece. this will be used for the lining and the outer fabric
2) a 9″ by 2 3/4″ piece. this is for one of the card pockets! use the same fabric that you used for the outer fabric.
3) a 9″ by 3 3/4″ piece. This is for the other card pocket and use the lining fabric for this!! *i would also suggest using a medium weight interfacing for the “flimsier” fabric for stability! I wouldn’t use it for both though because then it would be WAY too bulky.
STEP ONE! – iron fabric. trace everything and cut it all out! yum!
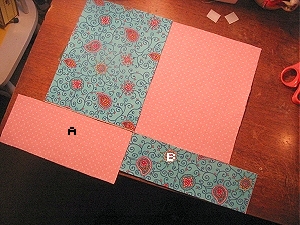
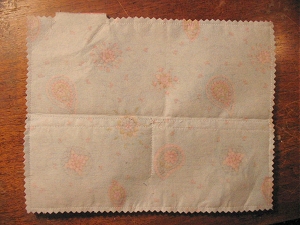
This is what all your cut out pieces should look like! A= lining fabric, 9″ X 2 3/4″ // B= outer fabric, 9″ X 3 3/4 ”
STEP TWO! – using the two card slot fabric pieces (A and B.) fold them in half long way so that the good sides are facing each other. sew up the side with the stictching being as close to the edge as you can make it! i’ll say its about 1/8″ but don’t hold me to it. i just make it small!
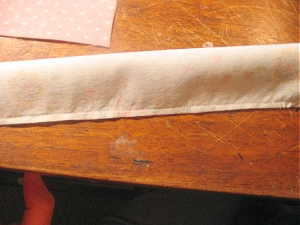
STEP THREE! -pull them right-side-out and iron them out flat. (its like you’re making the handles to a purse!) -also iron the outer fabric in half longways– its a guide for the next step.
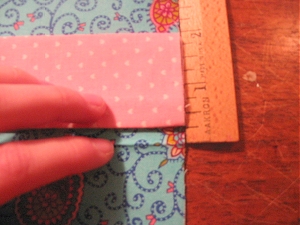
STEP FOUR! -place A about 1/4″ from the iron line with the seam NOT showing! sew that sucker down! again, make sure that you’re sewing as close to the edge as possible so there’s plenty of room for the cards! picture of step four:
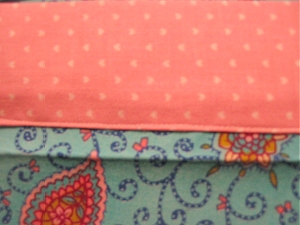
STEP FIVE! -sew B on JUST ABOVE the iron line, covering up the sew-job of A! again make sure the stictching is close to the edge!
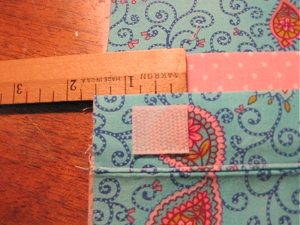
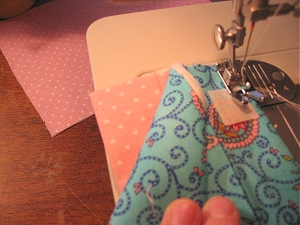
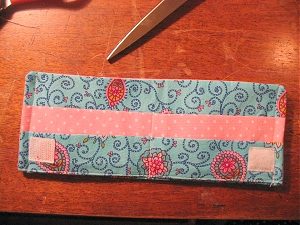
STEP SIX! -snag your little 1″ squares of velcro and measure 1 1/2″ in from each side and sew the velcro in place, ONLY ON B! fold the other pieces back and don’t mess up! hahahaha
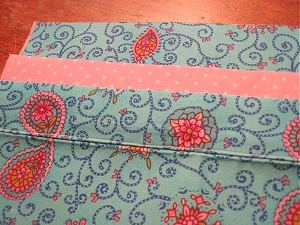
STEP SEVEN! -sew a line up the middle of the whole thing! this is to make the separate card holders. only sew up as high as the pockets go. i go up one way then back down so its double strength. -sorry the picture is upside-down, don’t get confused!
STEP EIGHT! -sew the outer fabric with all its goods and the lining fabric together, with good sides facing each other! leave a small opening so you can pull it all through. if this seems wacky just stick with me. i swear it works and looks awesome! – you can use a regular size seam allowance stitch WHATEVER ITS CALLED! good luck!
STEP NINE! -IF YOU HAVE ‘EM use your zig zag scissors to cut off some of the bulk edges, and leave the opening un-cut. do as i say.
STEP TEN! -turn the whole thang right size out. just pull it out through the hole! I SWEAR IT WILL COME OUT! then iron it out flat and push the corners out!
STEP ELEVEN! -fold it in half to make a wallet, and sew up each side so your $$ doesn’t fall out!! -then fold it in half so it velcro’s shut. and iron it with steam so that your wallet learns early on that this is how it closes!
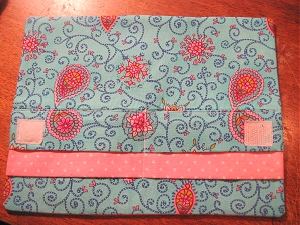
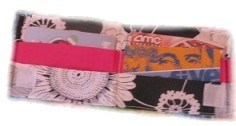
TA DA!!!!! YOU”RE FINISHED! I hope your wallet turned out for you! if not, try again!!!!
This project was contributed by Hdoglovesu


This is a great idea, but it needs a little tweaking in order to be useful. I made this wallet according to these directions, and when I put my cards in, it was immediately clear that the pockets were too big. Trim a little off the length and it would be perfect, or instead of one line of stitching down the middle of the pockets, do two lines about a quarter inch apart, so the pockets are tight and cards don’t fall out. It also seems to be missing the step where one would take the open side where the wallet was pulled inside-out and top-stitch or hand-stitch that hole shut. Otherwise a great idea.
Wow! great tutorial!! I’m thirteen, and it was insanely easy to understand this. I made one for my friend and filled it with little certificates “good for one sleepover” etc. She loved it!!!!! thanks!!!! I’m making more for Christmas gifts now!
P.S. If you have to buy new fabric for this, try fabric quarters from the quilting section (just make sure you line one of the big pieces with fusible interfacing). Fabric quarters are typically about 18 x 22, so you should be able to make two wallets out of two quarters. Each one typically costs about a buck, and 1/4 yard of medium interfacing will probably cost you 50 cents to $1. So, if you already have thread and some kind of closure, you should be able to make this for around 3 dollars!
Note: Go easy on your machine and use longer stitches when sewing through so many layers of fabric. If you really get stuck, you may have to “hand walk” the machine over heavy seams. I also added 1/2 inch width to the two pocket pieces to keep the cards in.
I would definitely prefer a version of this with some kind of snap closure.
Great project for experimenting with embroidery stitches, applique, and embellishments!
Added a velcro closure tab and had issues with the velcro not staying attached. 🙁
Otherwise, it turned out halfway decent (corners don’t match up 100%… but close enough). Also, I added a handy zipper pocket to the outside back to hold coins.
My wallet turned out adorable! Thank you!
Thanks!!!!!!just made one and it’s the best!!!!!!!
That’s a great tutorial. Easy to understand tutorial – well done!! Thank you so much for the tutorial.
Looks so so hard.
this is so complex!
This is a great project! Just made my first wallet and I love it!!
Wow seriously complicated but sooo cool and cute I wanna hug and kiss you guys on the lips!!!!
This wallet looks really neat. My boyfriend made a wallet that looks much like this one. His is made out of duct tape. I am going to try to make this one out of more masculine fabric. It will have a little bit more class than the one he is carrying not. LOL
It is ssooooooooooooooooo hard make it a little less complicated but u r so funny
oh my gosh you are so funny I love you
i really liked this pattern it is really easy to make.
cute
kinda hard though. Maybe you should do some more wallets but not as complicated. 😀
Its nice though
Great tutorial! I ended up backing the backing and lining half the width, so 9”x3 1/2”. The finished wallet was too thick with them being 7″ in width, IMO.
i like the ideas, but after every sentence, could you NOT leave an exclamation point?
Thanks so much for this cool pattern. I’m a complete sewing newb, but I managed to make a pretty neat wallet first time round. The coolest thing is it uses hardly any material, so I’ll be able to make lots with all the little scraps of material I have.
Cheers! 🙂
I made these wallets as christmas gifts for my girlfriends! It was fun putting together different combinations of different fabric to see how different they could look.
The only thing I altered was instead of using velcro, I sewed a button to the front of the wallet and half of a hair tie in the side and made a little loop. This looked more sophisticated and less homemade.
cute!
So many use material fabric can be made like it, very inspiring…
I really liked this project. It was pretty easy and everyone is impressed when I show them my wallet. I used some leftover material from a plaid flannel shirt and used one of the buttons to close it. I also used velcro so it is extra secure. I might make my friend one for Christmas. Thank you!
Wally-world has these really cool squares of material that are in their quilting section. They are like a foot square and some of the neatest fabrics, colors and designs, and would be great for this project.
I love this pattern. Thanks for sharing. I’m not new to sewing, but I want you to know I found it very easy to read, with perfect photos. 🙂
I need a walet really bad and this is a lot cheaper than buying one. I am so going to try this!!!
i love this!! this is so cute!!!
so cool!!!
I think this is a great idea! your instructions could use a bit more detail though:(
I love the idea and everything but the instructions sucked and were very confusing. I don’t like Velcro I think its tacky and make a fabric wallet look very cheap. I recommend using a magnet closure or a button and elastic. Congrats to anyone who made this wallet and got it right the first try. You rock! I will def be using this idea again but I will def not follow the instructions. maybe just the measurements. Thanks for the idea
This is a very nice wallet.
I was concerned about the four pockets, so I improvised into making a 10 pocket wallet (Six holders on the main wallet, and a flap of four that flips in and out from the side.) It worked really well, but some of the seams were messy, being my first attempt.
My second try worked very nice, but I had the same problem on both my first and second wallet:
*all the gift card slots were too short.*
I suggest adding .5″-1″ to the lengths of all the gift card holders, and I also suggest making them nice and taut before sewing…
Besides that, nice job. Still deserves 4 stars (:
I might improvise a little, but this seems like it’ll be pretty fun & easy to make.
By the way, your instructions cracked me up! It’s so casual and I feel like I can get a sense of your personality, which is kinda funny to me: “fold the other pieces back and don’t mess up!hahahaha” ,” I SWEAR IT WILL COME OUT!” , “do as i say.” lol Thanks for the laugh & the cute wallet instructions.
This looks so fun, and EASY!!! Which is really good for people like me! 😉 thanks so much for giving “us” all these great ideas where we can REUSE, and in a way RECYCLE things we have instead of having to buy new things, and spending money that we could be saving!
Easy, fun and cute. Perfect rainy day project, and it gave me ideas for others! Thanks!
hey, where do you get that cool fabric? i have a hard time finding good fabric !
Awsesome!Love It!!!
great idea!! terrible instructions. if youre into winging it, this is the project for you. i did this wallet 2 times. once with the posters instructions, which left out major points of the project. & then again by improvising. i added 1/4 of an inch to all my measurements. & use a regular, 1/4 inch seam for everything. i also hated the velco, too bulky!! … so, i used some elastic & a button, which is a very easy substitution for the velco. but all in all, the idea was great, you just have to make this project work for you!!
So easy! I’m a newbie when it comes to sewing but this was a piece of cake!
Thanks so much it really helped. I’m so happy I’m not at the store looking for a wallet. You have to be careful of ripping out the stitches. Also it helps if you put a small piece of velcro on the top for extra support when you’re closing it. You also might want to make everything a half an inch bigger. I cant wait to try it.
love this!!
love this! tytytytyty! cant wait!!!
great job i will make 1 as soon as i get the materials >3
Thank you so much for this pattern, I did a practice run yesterday and it turned out great! I will be making many more of these! I love that it took less than an hour to complete. Thanks again!
this is cute!
i will surely make it & it will join my “collection” of other wallets (duct tape and magazine) 🙂
Super easy! This is an excellent project. I was look for an easy wallet pattern and this was perfect. Thank you!
This is so cute and easy! Thank you so much 🙂
That is so cute! :]
This wallet is very fascinating! i absolutley love it I use it for lots of things such as: notes, change, cards and more!!!! because my other wallet keeps on breaking and it is too fragile, this wallet is really good for condition. When I carry it around in my bag, and then take it out, it looks really fascinating for people I dont know !!!!!!!!!!!!!!!!!!!!!!
Thanks for the idea! I will carry on making more and more until i run out of fabric!
Once again, thanks
Yours sincerely,
Cammy
Whoever says they cant do this must be stupid. I am totally new to sewing and it made total sense. Granted it may not state that 2 of the big pieces are needed but anyone with any common sense should kind of be able to figure that out. Whoever wrote the comment about it being better if written by a third grader should ” jog on” and stop being such an idiot.
really really cool…thx for this cool craft…
greetings from germany….
Thanks for the pattern & Instructions
Great idea, poor instruction. There’s no way with these instructions that you ended up with that wallet pictured. You seem to have left out a piece of fabric (9×7) and some pretty important information. While I tried executing this twice, and failed twice, (I had to guess and improvise) it could’ve been both written and described better by a third grader.
thanks so much for your idea now i don’t have to go spend $30 dollars on a wallet i can make it for five and have the fun of making it so it is a win:win. If you have time buzz over to my page and check out my comments!!! (thanks again!!)
i agree, would i be able to use blue jean material? i am trying to use up scraps of material i have lying around, and i have a ton of this. if any one tries it let me know how it turns out. love the pattern! 🙂
oooh I wanna try it…
in your tutorial, I like how you put pictures, but the text… makes you seem like an excited person 🙂
This is a great wallet for a boy i made 13 of the for x-mas gifts for all the boys at the day care i work at and for the boys in my family.
I just put one pocket on mine 9X5 piece worked great and moved the Velcro up just a little . Thanks they all loved it.
cool project!! im going to make one for my grandfather because he really needs one. what should i make it out of ? would blue jean material work?
I am a dude and I made this out of old cargo shorts because I refuse to pay a ridiculous amount of money for a new wallet when i could just make one myself. I found this DIY while i was googling how to make a duct-tape wallet and I decided this would be a lot better looking. Although my sewing skills blow hard it still looks pretty darn sweet. Thanks for showing me how to do it.
My grandson asked me to make him a wallet (he is 7 years old). I have just begun sewing and found this….this is perfect. Came out great on my first try! I loved your instructions….most instructions assume you know what you are doing and it is hard for beginners.
Thanks so much!
OMG!!!My mom gave me this for my Birthday cause I wanted a wallet and it is fantastic!
All my friends want one but I won’t tell them where I got it.I love it thanks so much
An ok project overall, but I’d probably add a flap with a snap closure instead of velcro to make it look more polished.
How much material (in inches) will i need altogether???
Time to get started~~~~
Thanx for the wallet idea it was soooo easy but fun to make i luv it!
it´s so cute
WoW! i cant wait to try this kool wallet project out! well time to get started!
thats sooooo coool! i cant wait to try it!-nana
The result looks wonderful
but it seems to be difficult
I felt like the very first instruction about the materials was confusing. It mentions cutting 1 piece 9 x 7 inches but then says “which will be used for the lining and outer fabric”. The picture then shows two pieces of material this size. Also it mentions using interfacing for the “flimsier” fabric but not both. Well…I’m confused…does that mean use interfacing for the outer fabric but not the lining or vise versa? Do I use interfacing for the pocket pieces? I also got lost on step 4. And what happened with the large piece of fabric for the lining? I’m so lost. Can anyone help?
I’m sorry but I could not follow these instructions and I didn’t feel all of the pictures were helpful either. I’m not a new sewer either. I ended up with one of the large pieces of fabric not being used. I just didn’t get it. At least not on the first try…
i just made this and it turned out great!
not only super cool!!!super easy:D
Perhaps it didn’t turn out properly because the writer didn’t include measurements for seam allowances? I always forget them when I measure, and I know I’m not alone.
Great tutorial, by the way! Awesome for all that stupid scrap material I have left over from other projects. Now I can make it into something great– and useful!
I really like it, easy, but it seems measurements are off. I would suggest adding one more inch on, because my wallet came out short, and I did everything to an exact. I also use three different fabrics so the pockets differ from the inside material.
This looks like fun and a good craft to give away to friends. I like how it has PHOTOS
Hey that looks like a great craft to do
Making one to match a bag I made, but unfortunately one of the instructions about making a second 9×7 peice was weird…
Goregous! Thanks for the pictures too, they really helped! : )
i am being honest. i didnt like this because the steps were not detailed enough. I didnt know when to turn the fabric or the exact places to sew it. But thanks for your effort.
i liked it very clever design but it didnt fold as nicely as i would have liked it puckerd abit but i think that was do to the fabric i had though it was just a plian cotton
My daughter and I made this together tonight. She loved it as she was able to do most of the work herself. Very nice, thank you. She cant wait to go to school and show her friends
thanks! this is great!
this craft is really cute at the end but it wasn’t very specific when it came to directions even my mom couldn’t figure it out….the first one i made was totally ruined because of a step that missed telling you something.i redid it and it turned out good
hello, great tutorial!
i just have one question : can we use a hook to close it (would the wallet be too thin)?
Thank you! I love it.
Wow! What a great project! I’m gonna make a couple to amtch some of the bags I’ve made in the past. Very good job on explaining! Thanks for the pics too!
really cutee! looks super easy to make!!definetely going to give this one a shot =)
Love this! Thank you so much for the tutorial. After making a handful of bi-folds, I got creative and started making tri-folds which are super cool too! Now I have room for coins!
Peace
Thanks for sharing! I’ve been needing a new wallet, and this has given me some great ideas!
Nice instructions, I’m trying to make it now!
Awesome, simple & very useful. Thanks for sharing. I’ll definitely try this one!
yay, i will try it!
Wow, I made a wallet! Thank you for your instructions and pictures!
This project is great. I’m still working on it, since I don’t have a sewing machine, but the instructions are really easy to follow, and I can tell it’s going to look great!
all the boys get wallets, why can’t girls? that’s why i love this!
thank you so much! your directions were pretty clear even though i got lost at some point, it was fairly simple to figure out what to do. and it came out great!
love love love it. It was so easy to make!
Really easy and cute prints!
may I ask, on Step Two, did you fold the edges in before you sewed them? Because when you pulled it right-side out, the finish is not similar as to when you don’t.
I really enjoyed making this wallet. It was really easy!
very easy and good instructions!!!!!!!!!!! it is great! i haven’t done it yet but it sounds god to me I’ll start it now!!!!!!!!!!!
Awesome tute! Great pics and easy to follow instructions.
this is great – i was just wondering why the measurements for the pockets say 2 3/4 for the lining and 3 3/4 for outer when the pic shows the lining bigger than the outer
nice
very good explaining and photos!
This is so cool I am so going to make it.
good for a beginner, i will make another but with some changes!
cool idea:D
I did this project and it turned out really great! I am some-what of a beginer and this project very easy to understand. All my friends are begging me to make them one too!******
Wow, that looks amazing, can’t wait to try it out!
totally rad!!!!!!
gr8 craft, i made one and it was better than some bought wallets ive got!!!!!!!!
this is a great patern! thnks
This is an awesome idea! I can’t wait top try it out. Excellent job explaining!!
Cute idea! I think this wallet could benefit from some interfacing and a magnetic snap as opposed to the velcro, though.
This pattern looks like it was put together pretty well, but I think It was a little to hard for me, because I am a beginner.
wow great tut!
I will be making this one today!
Your teaching method is soooo cool!!
xx Manu
so easy even an idiot can do it 🙂 thanks for making it beginner friendly!!!!
Easy to make! Thank you for the pattern.
this is AWESOME!!! i am sooo going to make one for all my gal pals. i am also going to make one for a guy pal with some edgy zebra stripe pattern. thanx soooo much. now i dont have to do ANY christmas shopping!!!!! 😀
Hey, I really love your wallet!!! Well done!!
SUPER COOL!!!!!
thanks!!!!!!!
great tutorial
I found that my change kept falling out, so my mom and I figured out a little flap that covers up the opening very well. Im gonna make one to match my “slouchy hobo bag”. thank u so much for the awsome instructions!!!!!
This was super easy to follow. I finished mine differently so that you don’t see the seams. I made 4 this weekend for my friends and I!
It was VERY easy to understand! I haven’t been able to find a wallet pattern that i understood, and this one is very simple! Thank you!
omigosh, this is totally 5 star, i’m not kidding.
i really really really needed a wallet, and a duct tape wallet would have cost like 5 dollars, but this is waaaaaaayy cooler.
I like how easy the pattern is I made the wallet in 15 min.I used some old old jeans to make a bag and a matching wallet.
this will be great for my holidays 🙂 TQ fo ur excellent ideas lolx
This is a great tutorial, thanks! The photographs really help. I have linked to this post from my blog at http://craftworker.blogspot.com/2007/05/super-cool-wallet.html
Thanks for the easy-to-follow instructions and accompanying photos. I’m a beginner and I managed to make this wallet!
i tried it and it worked amazingly well and the steps were very clearly stated, thanks for the help 😉
thank you for sharing
huh? ~:-/sick and cherry?
(btw i love this project!)
THAT IS SO SICK AND CHERRY! IT ROCK’S SO HARD!
This is just what I was looking for to carry at work. Can’t wait to make it!
i havent made this yet but i plan to, and i think it is just sooooooooooo cute. oh and this explains the instructions very nicely!!!
I love it..thanks so much…i needed a new wallet and everywhere i looked there was nothing simple and what i wanted, so i decided to make one, and searched on the internet, and when i found your site and tried it, i love it…thank you so much.
I’m gonna try it out right now!!!!! It looked really confusing at first but I get it now.
No wonder it’s Super Cool =D
Great tutorial!!!
wow, just made one! the wallet was a little bit to small to work out properly, but i’m gonna make another one!
I love the way you describe things. Thank you!!
I suppose you are to sew the hole shut from turning it all right side out? Any tricks to make it invisible? I am going to try this fer sure.
cute i love it like a lot.although i dont understand.learner of sewing,yes indeed
At first i found it a bit hard to understand, but I get it now. Great Idea! 🙂
that is a really cute wallet it is also good that you put pic’s for every step
So Cute! I can’t wait to try!
I would love to do this. But then I don’t know how to use a sewing machine. Maybe I can get my mother to make it for me hehehe.
WOW!!! I have plenty of material that will provide a ton of wallets (to match each outfit!) Thanks!
I saw this on craftster originally. I’m totally in love with this wallet and make one to go with every bag I make. Thank you!
Very well layed out and easy to follow, ty !
I originally saw this tutorial on craftster but, alas, it wasn’t very printer friendly. Imagine my delight in finding it here complete with pictures! Thank you!