
Get more details about this project
What you need
Square candle mould or Bottom of a milk carton
Candle wick
Candle wax
Optional Candle Dyes
Sea Shells
Instructions
How to melt the Wax:
Place your required wax amount into the heavy Pan and place it on the heat. Slowly heat the pan till all the wax in your pot melts. Don’t allow the wax to get too hot.
Adding the Dye:
Once you have melted your wax you can add your dye. Add a small amount at a time as it is very strong.
Note: When dried the color is much lighter.
Getting the wick ready:
Dip your wick several times into the melted wax to give it a wax coating to insure it burns evenly.
Getting the mold ready:
Start by cutting down your milk carton so that your candle mold is of appropriate size for the candle(or use other mold).
Next attach your wick to a pencil or length of wood that will sit across the top of your candle mold (top is the open end).
Next make a small hole in the bottom of the carton to thread your wick through. Pull it tight so that the wick from the pencil to outside of the carton is firm. A loose wick will cause your candle to have problems burning later on.
Now stick down the wick at the bottom with some sticky tape and using a piece of blu-tack or plasticine close up the hole so no wax can seep out.
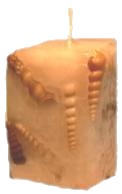
Adding the Shells
Meantime place your seashells into your milk carton mould. Do not place them neatly as the candle will need to form in the cracks of the shells. The less organized the better. Do try to keep the center of the candle (around the wick) free from shells, so that the wax can form around the wick insuring a consistent burning candle.
Slowly pour your melted wax over the seashells and around the wick area till the milk carton is full.
For best results place the shells along the outside edge of the mould.


Making for Mother’s Day hoping my mom and grandma will like it!
Even making a golfball holder for Father’s Day made out of a butter carton which is really big and covering with golfball wrapping paper I hope my dad and grandpa like that too!
I usually pour some wax on the walls of the mold and place the seashells then put it in the fridge for 5 min.
Now pour your wax in the mold and let it harden. Then carefully remove mold.
xoxo Liz
Stoked – can’t wait to make my Summer candles.
These Shells are placed to fill the mold so you do not need to place them on the outer edges, they automatically randomly sit there.
How do you place the shells along the outside edge of the mould (inside)?
its ok. cool craft though but a bit difficult to get the shells to stay where you want them to in the milk carton.
really enjoyable.thanks.
This works but even better is to make the shells out of wax with a harder wax then place in your candles. This way it looks great adn they can burn as well.The same goes for the pinecone one. Karen