
Get more details about this project
What you need
What You Need
- 100 g light green 8 ply yarn
- Small amount of brown 8 ply yarn
- Small amount of white 8 ply yarn
- Small amount of emerald green 8 ply yarn
- Small amount of red 8 ply yarn
- Size 8 US / 4 mm knitting needles
- Yarn needle for sewing in ends
- Scissors
Acrylic or wool-blend yarn will both work well for this scarf. If you are knitting for a child, choose something soft and washable. Christmas scarves tend to meet hot chocolate, sticky fingers, and possibly a biscuit crumb or two.
If you are building up your festive yarn stash, yarn kits and basic 8 ply yarn packs from places like Mary Maxim or Amazon can be handy, especially if you only need small amounts of red, green, white, and brown for seasonal projects.
Instructions
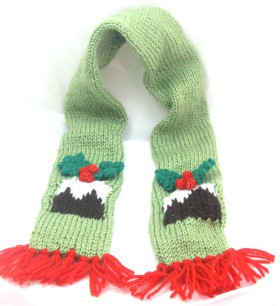
There is something wonderfully cheeky about a Christmas pudding scarf, isn’t there? It is festive, a little bit silly, and exactly the sort of handmade Christmas accessory children love wearing when the weather turns chilly. This free Christmas pudding scarf knitting pattern is worked in a bright green base with a sweet little plum pudding motif at each end, finished with holly leaves, red berries, and optional red fringe.
This is a lovely Christmas knitting project if you want something more playful than a plain scarf, but not so complicated that it ends up living half-finished in the bottom of the yarn basket until next December. We have all had one of those projects.
The scarf is knitted flat in stocking stitch using 8 ply yarn and 4 mm needles. The pudding design is worked directly into the scarf using simple colour changes, then the leaves and berries are made separately and stitched on at the end.
U
Finished Size
The original scarf measures approximately 30 inches before the second pudding section is started, with extra length added by the end section and fringe.
You can make the scarf longer by knitting more rows in light green before beginning the second pudding motif.
Abbreviations
K – knit
P – purl
St st – stocking stitch
Sts – stitches
Yrn – yarn round needle
K2tog – knit 2 stitches together
Notes Before You Start
This scarf is worked flat, not in the round. The pudding motifs are knitted into each end of the scarf.
Because the main scarf is worked in stocking stitch, the edges may curl slightly. You can block the finished scarf gently, or add a simple garter stitch border if you prefer a flatter scarf. To do that, knit the first and last 3 stitches of every row, while keeping the centre section in stocking stitch.
For the closest version to the original pattern, follow the instructions below as written.
Scarf Instructions
Using light green yarn, cast on 32 stitches.
Work 14 rows in stocking stitch.
That means:
Row 1: Knit
Row 2: Purl
Repeat these two rows until 14 rows have been worked.
First Christmas Pudding Motif
Begin the Christmas pudding design.
Row 1: K10 green, K12 brown, K10 green
Row 2: P10 green, P12 brown, P10 green
Row 3: K10 green, K12 brown, K10 green
Row 4: P10 green, P12 brown, P10 green
Row 5: K10 green, K12 brown, K10 green
Row 6: P10 green, P12 brown, P10 green
Row 7: K10 green, K1 white, K6 brown, K1 white, K3 brown, K1 white, K10 green
Row 8: P10 green, P2 white, P1 brown, P3 white, P3 brown, P3 white, P10 green
Row 9: K10 green, K3 white, K1 brown, K8 white, K10 green
Row 10: P10 green, P12 white, P10 green
Row 11: K10 green, K12 white, K10 green
Row 12: P11 green, P10 white, P11 green
Row 13: K12 green, K8 white, K12 green
Row 14: P13 green, P6 white, P13 green
Change back to light green.
Knit 1 row in light green.
Continue in light green stocking stitch until the scarf measures approximately 30 inches from the cast-on edge.
Second Christmas Pudding Motif
The second pudding motif is worked so that the pudding sits correctly at the opposite end of the scarf.
Row 1: P13 green, P6 white, P13 green
Row 2: K12 green, K8 white, K12 green
Row 3: P11 green, P10 white, P11 green
Row 4: K10 green, K12 white, K10 green
Row 5: P10 green, P12 white, P10 green
Row 6: K10 green, K8 white, K1 brown, K3 white, K10 green
Row 7: P10 green, P1 white, P5 brown, P2 white, P3 brown, P1 white, P10 green
Row 8: K10 green, K12 brown, K10 green
Row 9: P10 green, P12 brown, P10 green
Row 10: K10 green, K12 brown, K10 green
Row 11: P10 green, P12 brown, P10 green
Row 12: K10 green, K12 brown, K10 green
Row 13: P10 green, P12 brown, P10 green
Change back to light green.
Work 14 rows in stocking stitch.
Cast off.
Weave in all loose ends neatly on the wrong side of the scarf.
Knitted Holly Leaves
Make 2 leaves.
Using emerald green yarn, cast on 15 stitches.
Begin with a purl row and work 3 rows in stocking stitch.
Next row:
K1, then repeat the following section across the row: yarn round needle twice, K2tog, slip the last stitch back onto the left-hand needle and knit it again. Repeat this slipped stitch once more.
Next row:
P1, purl the next loop and drop the following loop. Repeat across the row.
Knit 1 row.
Cast off.
To shape the leaf, fold the cast-on edge in half and stitch it together. Repeat with the cast-off edge. Stitch the two sides together so the edges form a scalloped leaf shape, with the cast-on and cast-off edges becoming the centre vein.
Make a second leaf in the same way.
Knitted Berries
Make 2 berries.
Using red yarn, cast on 7 stitches.
Row 1: Purl
Row 2: Knit
Cast off.
With the wrong side facing out, roll the small knitted piece into a berry shape. Stitch it securely in place.
Make a second berry in the same way.
Finishing The Scarf
Position one holly leaf and one berry above each Christmas pudding motif.
Stitch securely in place using matching yarn.
If you would like to add the red fringe shown in the original version, cut lengths of red yarn approximately 7–8 inches long. Fold each strand in half and use a crochet hook or your fingers to pull the loop through the scarf edge. Pull the yarn ends through the loop and tighten gently.
Trim the fringe evenly.
Give the scarf a gentle block if needed, especially around the pudding motifs and edges.
Extra Tips
If you are knitting this scarf for a younger child, check the length before adding the second pudding motif. Children’s scarves can get long very quickly, and nobody wants a scarf dragging through puddles on the way to school.
For a softer Christmas look, try mint green, cream, and cranberry red. For a bolder novelty scarf, go brighter with lime green and cherry red. You could even knit the base in red or cream if green is not your thing, though the pudding design does pop nicely against the original green.
This is also a fun pattern for using up leftover yarn from other Christmas knitting projects. If your stash is anything like mine, there is probably a mysterious little ball of red yarn hiding in there from three Christmases ago.


Do you fold the scarf sideways and stitch together to form a tube?
Thank you for the pattern, can’t wait to try this 🙂
made the scarf – however, I am having a problem with the leaves. Is there a tutorial showing the leaves?
looks mint love it