
What you need
Card stock
Fabric Paints
2 ready made totes
Flat paint brush
Exacto Blade
Cutting mat
Instructions
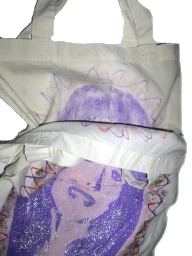
So I designed this reversible bag with my photo stencil on one side. So mum knows that the stuff in the bag is for me. Then When I send the bag back, I turn it the other way to reveal my mothers photo stencil so she knows that the bag contains stuff for her to take home.
I plan to make 2 of these bags, one for my house and one for her house. So either way we will both have a bag at one time.
This project uses a stencil made from a photograph. To make the stencil, take your photo into an editing software and do as follows: Make it black and white, change contrast levels until a single layered shadow image is created.
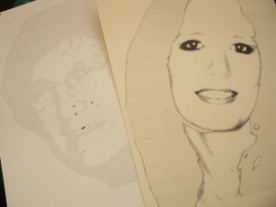
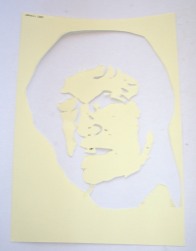
Print your stencil out onto card stock, as card is more durable than paper when painted. Using an exacto blade and protective mat cut out the dark sections of your photo to create a single layer stencil.
Take your ready made tote bag and stencil the design onto one side, make sure you place some card in side the bag to prevent the paint going through.

I used a purple paint with glitter added to it for a more retro funky look. Use the brush to brush away from the edges of the stencil to prevent bleeding. Remove the stencil once finished and embellish with your own designs, I added a Swirly Halo and a glitter ring around the outside of the photo image.
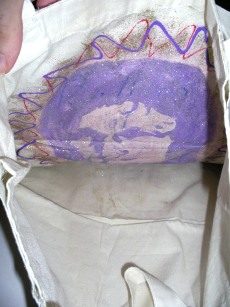
Do the same thing for the second tote and second Image. Allow both bags to dry overnight. Now you should have 2 totes each with a design on the front. To make the tote reversible, place one tote inside the other. The tote going inside should be inside out. Secure the tote inside by remove one set of handles and sewing the top of the bags together either use a sewing machine or go for a funky blanket stitch using wool or embroidery thread for a more embellished finish.
Now you should have a tote bag that is lined with another tote bag. Which means you can turn the bag inside out and see the other stencil as shown below.


this is an awesome idea!
i think it can go beyong totes and into tshirts.
i used a similar technique for making the stencil for a painting i did on canvas.
I hate it. Sorry.
Instead of stencilling I would embroider designs on my machine to distinguish between mums and mine! Yes, I intend to make one – great idea!
What a neat idea! I love stencils.
it looks a little messy. i’d eliminate the squiggly lines.
Creative idea. It could be done with any picture and it doesn’t have to be reversible.
I thought it wasnt very interesting
Cool Idea! How much does it equal up to total?
ehh…okay project