
Get more details about this project
What you need
Orange polymer clay
Green polymer clay
Liquid polymer clay
Clay blade or plastic craft knife
Polymer clay sculpting tool
Toothpick or bamboo skewer
Eye pins or jewelry wire, optional
Jewelry adhesive or cyanoacrylate glue, if using an eye pin
Ceramic tile or another polymer-clay-safe work surface
Baking paper or an index card
Polymer clay glaze, optional
Dedicated oven thermometer
Instructions
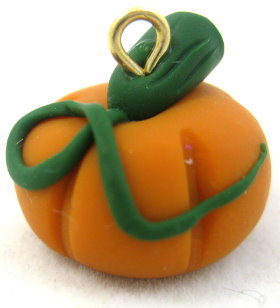
Condition orange and green polymer clay until it is soft, flexible and free from cracks. The orange clay forms the pumpkin body, while small amounts of green clay create the stem, leaf and curling vine.
You can turn the finished pumpkin into a pendant or charm by adding an eye pin, or leave it without hardware and use it as a miniature decoration. Always bake the project according to the temperature and time specified by the clay manufacturer.
Instructions
Step 1: Condition the clay
Wash and dry your hands before beginning, especially when working with light or bright colours.
Knead, roll and fold the orange polymer clay until it becomes soft and pliable.
Repeat with the green clay.
Bend a small piece of each colour. If the clay cracks along the fold, continue conditioning it before sculpting.
You will need considerably more orange clay than green.
Step 2: Divide the clay
Roll the orange clay into an even log.
Cut the log in half, then continue dividing the pieces until you have the amount needed for each pumpkin.
This method makes it easier to produce several evenly sized beads.
Divide the green clay into smaller portions for the stem, leaf and vine.
Step 3: Shape the pumpkin body
Roll one portion of orange clay into a smooth ball.
Press gently on the top and bottom to create a squat, slightly flattened shape.
Rotate the pumpkin as you work so it remains balanced. Avoid flattening it so much that it resembles a disc.
Step 4: Create the pumpkin segments
Use a clay knife, plastic craft knife or rounded sculpting tool to make vertical indentations around the orange pumpkin.
Begin at the top centre and draw each groove down towards the bottom centre.
Space five to seven grooves around the pumpkin. Press deeply enough to define the segments without cutting completely through the clay.
Smooth any rough edges with your fingertip.
Step 5: Make the stem hole
Use a toothpick or bamboo skewer to create a small hole in the top centre of the pumpkin.
Do not push the tool all the way through the bead.
Place a very small drop of liquid polymer clay inside the hole. Liquid polymer clay helps bond the unbaked green stem to the orange body during baking.
Step 6: Shape the green stem
Roll a small portion of green clay into a short cone.
Insert the narrow end of the cone into the prepared hole.
Bend the wider end slightly to create a curved pumpkin stem. Add shallow lines with a sculpting tool if you would like a more natural texture.
Press gently around the base so the stem sits securely without crushing the pumpkin.
Step 7: Add the leaf
Flatten a small ball of green clay between your fingers.
Shape it into a pointed oval or teardrop leaf.
Use a toothpick or sculpting tool to add a centre vein and a few smaller side veins.
Place the leaf beside the stem and press it gently against the pumpkin. Add a tiny amount of liquid polymer clay beneath it if additional support is required.
Step 8: Create the curling vine
Roll a very small amount of green clay into a long, thin strand.
Keep the strand even but avoid making it so thin that it breaks during handling.
Curl the strand into a loose loop or spiral and arrange it across the top and side of the pumpkin.
Press only the attachment points into the pumpkin. Leave parts of the vine slightly raised to create dimension.
Step 9: Add the hanging loop
To create a charm, insert an eye pin or a loop of jewelry wire into the top of the pumpkin near the stem.
Push the pin deeply enough to hold its position without allowing it to emerge from the bottom.
Polymer clay does not form a permanent bond with smooth metal. After baking and cooling, the eye pin may need to be removed, coated with a small amount of jewelry adhesive and reinserted.
Alternatively, use a toothpick to create a hanging hole before baking. Make sure the opening is large enough for the intended jump ring or cord.
Step 10: Check the bead
Inspect the pumpkin from every side before baking.
Make sure the segments are evenly defined, the stem and leaf are secure, and the hanging loop is straight.
Remove dust or lint with a clean sculpting tool. Avoid using household cleaning products on unbaked polymer clay.
Step 11: Bake the pumpkin
Place the pumpkin on baking paper, an index card or a polymer-clay-safe surface.
Bake it for the exact time and temperature specified on the clay packaging. Different brands and clay lines can require different baking conditions.
Use an oven thermometer to check the actual temperature. Do not guess or increase the heat to shorten the baking time.
Allow the pumpkin to cool completely before handling it firmly.
Step 12: Secure the eye pin
After the bead has cooled, test the eye pin gently.
If it moves or pulls out, remove it carefully.
Place a small amount of suitable jewelry adhesive or cyanoacrylate glue on the straight section of the pin and insert it back into the existing hole.
Wipe away excess adhesive immediately and allow it to cure according to the product directions.
Step 13: Glaze the bead
Glazing is optional. Polymer clay does not require glaze for durability when it has been baked correctly.
If you prefer a glossy finish, apply a thin coat of glaze specifically approved for use with polymer clay.
Allow the glaze to dry and cure completely before turning the pumpkin into jewelry.
Ways to Use Your Pumpkin Beads
Attach one pumpkin to a chain to make a fall pendant.
Add a jump ring and lobster clasp to create a removable stitch marker.
Turn smaller pumpkins into earrings.
Attach a pumpkin charm to a keyring or zipper pull.
Use pumpkins without hanging loops in dollhouse or miniature fall displays.
Make a collection in orange, white, sage green and muted terracotta.
Safety Information
Follow the polymer clay manufacturer’s baking directions exactly. Do not exceed the recommended temperature.
Use an oven thermometer because domestic ovens can run hotter or cooler than their settings indicate.
Work in a well-ventilated area. If clay burns or produces smoke, turn off the oven, ventilate the room and follow the manufacturer’s safety advice.
Keep polymer clay tools separate from tools used for preparing food. Do not place unbaked clay directly on food-contact surfaces.
An adult should handle sharp blades, wire, ovens and strong adhesives.
Small beads, eye pins and jewelry findings can present choking or puncture hazards. Keep them away from babies, young children and pets.
Wash your hands after handling unbaked clay and before eating.




sounds fun
like the fact that the steps are illistrated makes project easier to do.