
Get more details about this project
What you need
Ring base – adjustable styles work best and are easy to find at craft or jewellery supply stores (online or in-store)
Jewellery glue or a clear, strong “super-glue” style adhesive
Polymer clay in white, black, pink, purple, and yellow (any brand is fine — swap colours to suit your design)
Liquid polymer clay
Clay knife or plastic knife (a safer option for kids)
Toothpick or piercing tool for adding details
Shaped cutters in assorted sizes – this project uses a flower, heart, and circle (experiment with different shapes and sizes for a unique look)
Acrylic roller or wooden dowel
Sandpaper or a nail file for smoothing edges
Clay-dedicated pasta machine (optional)
Smooth work surface such as a ceramic tile, file folder, or wax paper
Instructions
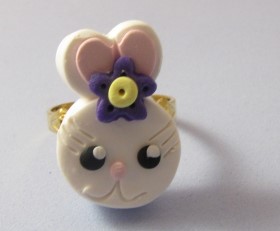
If you’re looking for a sweet Easter craft that’s both fun to make and easy to wear, this Polymer Clay Easter Bunny Ring is a perfect little project. With its cute bunny face, soft pastel colours, and simple shapes, it’s a great way to celebrate the season while getting creative with polymer clay.
This project is ideal for beginners, tween crafters, or anyone who enjoys making playful handmade jewellery. The steps are straightforward, the materials are easy to find, and there’s plenty of room to customise the design by changing colours, shapes, or expressions. Whether you’re crafting for yourself, making gifts, or creating something special for an Easter basket, this bunny ring is sure to bring a smile.
Let’s get started and make a cheerful Easter bunny ring that’s just as fun to create as it is to wear
Oven for baking – it is recommended to use a clay – only oven (toaster oven). You can also enclose your project inside two baking pans; clamp it closed, & bake in regular oven. Remove once cooled.
Steps: 1. Condition some white clay (about ½ oz or ¼ or a 2 oz block) until soft and pliable by rolling and squeezing in your hands. Test to see if it cracks when you bend it – that means it needs more conditioning!
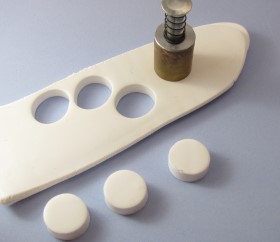
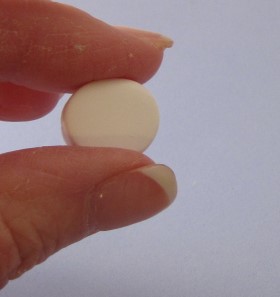
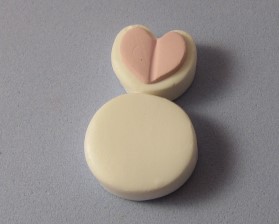
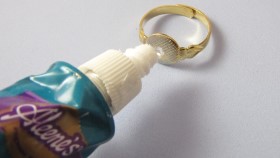
2. Roll out a sheet with your roller or pasta machine (about ¼ inch thickness). I used the thickest setting on my pasta machine & doubled it over on top of itself for twice the thickness. Roll it to adhere the layers with your roller and cut out a circle for each bunny’s head.


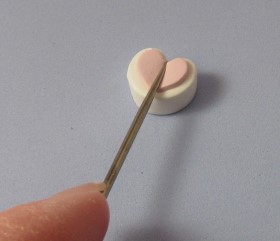
3. Gently squeeze each circle to create an oval shape.
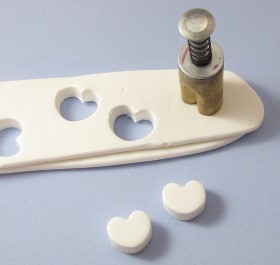
4. Repeat step 2 with more white clay and cut out hearts for each set of “ears”.

5. Repeat step 2 or 4, this time with a thinner layer of pink clay. I used the thinnest setting on my pasta machine & a heart cutter smaller than the first one used.
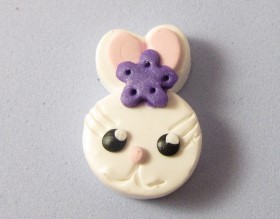
6. Press the pink clay heart on top of the white clay heart. Be sure to center the pink leaving an edge of white clay all around. Press down the center with the side of a toothpick or piercing tool to separate the “ears”.

7. Add a drop of liquid clay to the bottom of the ears and press them to attach to the top of the head.

8. Take a small amount of conditioned, black clay (pea size) & roll it into an even snake. Cut off a small section and divide it in half. This will assure similar sizes for the eyes.

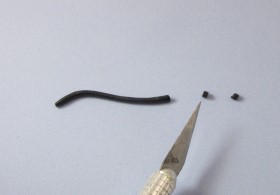
9. Roll each piece of black clay into a ball and press them onto the “face” where you want the eyes to be. You don’t need liquid clay if you press them flat.

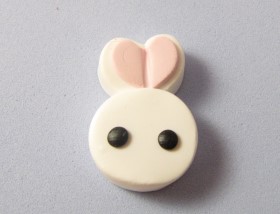
10. Repeat step 8 & 9 with conditioned, white clay for the highlights in the eyes. (This step is optional.)


11. Use your toothpick to make tiny eyelashes on your bunny. Make eyebrows for a boy!

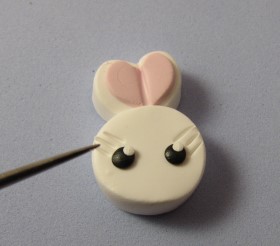
12. Use your toothpick to scratch a “mouth” on the bottom of the face by making a rounded “W” shape.

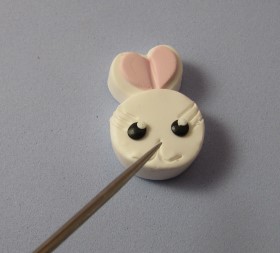
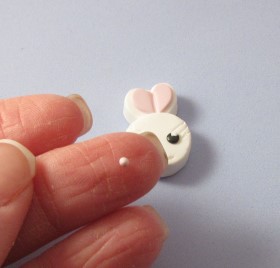
13. Roll a tiny piece of pink clay into a ball & press it into place for the nose.

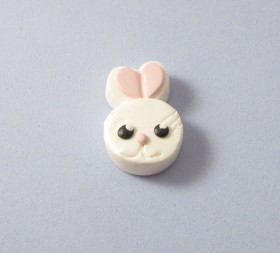

14. Roll out a small amount of conditioned purple clay (about ¼ oz) into an even sheet. I used setting 3 on my pasta machine. Cut out a flower shape.

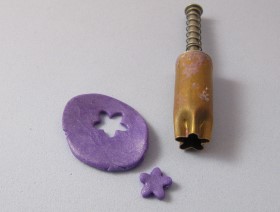
15. Add a drop of liquid clay and press it into place on the bunny’s ears.

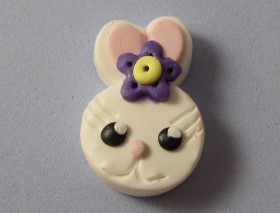
16. Roll a tiny ball of yellow clay and press it into place for the center. I added details to the center and petals by making indentations with my toothpick.

17. Bake according to the manufacturer’s directions.
18. Glaze if desired. I like varathane – found in most hardware stores. For small projects, use the clay manufacturer’s glaze. The bottles are smaller & more affordable!
19. Sand or scratch up the bottom of the clay piece before adhering it to the base. Especially if you glazed it, this will help ensure a secure attachment.
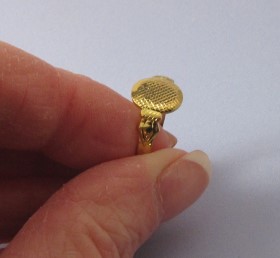


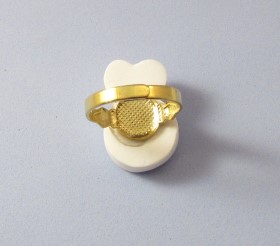
20. Enjoy your new jewelry for yourself or give it as a fun, seasonal gift!

***TIP*** ***Dark colored clay, like red, blue, etc. can leave some pigment on your hands. To help keep lighter colors from turning pink, etc. handle most of the light clay first. You can also use baby wipes to clean your hands and tools (alcohol is a solvent for the clay) or wear latex gloves & switch in between colors. ***Once you use cookie cutters, pasta machine, etc for clay, it is recommended to no longer use it for food. Shop around for inexpensive cutters at your local craft store.


What do you think of this project? Let us know!