
Get more details about this project
What you need
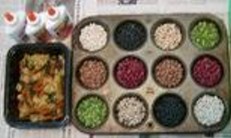
Precut corrugated cardboard squares, about 8 x 8 inches each
Seeds and dried beans, such as: white beans, black beans, small read beans, pinto beans, black eyed-peas, split green peas, white rice
Macaroni products, such as: Wacky Mac, spaghetti, veggie pasta, spiral and shell shaped pastas
Muffin tin
Meat tray, one or more, cleaned
White glue
Plastic covered container
Water in open container
Small sponge brushes, one for each child
Moist rag
Clear gloss acrylic finish (liquid or spray)
Paint smocks or old shirts
Newspapers
Instructions
Preparation:
Cover table with newspaper. Separate seeds and dried beans into muffin tin cups, and pour pasta into meat tray(s). Place white rice in a disposable cup for pouring. Add one part water to three parts white glue in plastic containers and stir. (Cover when not in use for future projects.) Use water container for cleaning brushes and place moist rag nearby for sticky fingers.
Instructions:
Prior to beginning this project, you may want to help your child name the different types of beans, seeds, and pasta on the table, and talk about colors, sizes, and shape. Briefly introduce mosaics and how we create them using various materials to paint pictures.
Remember to put on an old shirt or paint smock to protect clothing before beginning.
Give child a project board. Encourage him to glue the materials to the board creating a design in one or more of the following ways:
Spread a line of white glue directly from the bottle, and affix one type of material such as black beans or pasta to the glue to outline shapes.
Fill in areas with water and glue mixture using sponge brush, then fill in with beans or seeds.
Pour fine materials such as rice or seeds onto wet glue, filling in the area well, and press material down lightly with finger tips.
Allow the child to experiment with the materials and create a unique design. Monitor the process, discouraging the use of too much glue, or simply pouring mixtures of beans into piles on the project board.
Encourage planning ahead, using colors and shapes to create a design, and gluing materials to the board in a single layer. Turn the board sideways every so often and collect fallen materials to re-use.
Once the mosaic is finished, make sure all of the wet glue is covered with materials, and allow the project to dry. Spray or paint the dried mosaic with clear glossy acrylic finish.
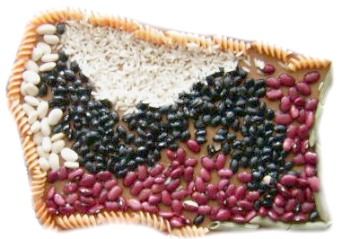


I remember doing this in grade school and had so much fun with it! We started our designs by drawing a loopy scribble on the cardboard, then filling in the spaces. You could use paper plates instead of meat trays. Have fun with it!
Have child design their tile dry, then transfer to glued tile.