
Get more details about this project
What you need
Okay, you’ll need a bunch of ties. Mine are all paisleys. A lot of lining fabric – mine is black velveteen.
One 18mm magnetic snap
Heavyweight stabilizer
Large graph paper (or newspaper) for pattern
Basic sewing supplies


Instructions
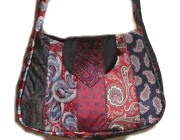
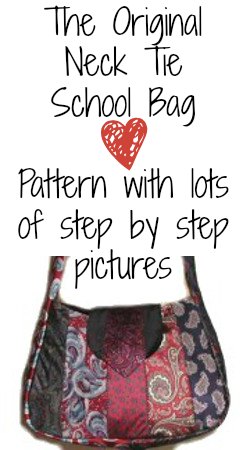
If you have a collection of old men’s ties that are no longer in use, don’t throw them away just yet! With this upcycling sewing pattern, you can turn those ties into a beautiful and unique bag that will be cherished for years to come.
This sewing pattern is perfect for anyone who loves to repurpose old materials into something new and beautiful. It’s also a great way to create a personalized keepsake that has sentimental value. Imagine carrying a bag made from your father or grandfather’s ties – it’s a way to keep them close to you and remember them in a special way.
The best part about this sewing pattern is that it’s easy to follow and doesn’t require a lot of experience in sewing. With a few simple steps, you can transform a pile of old ties into a beautiful and functional bag.
Not only is this an eco-friendly way to repurpose old materials, it’s also a great way to save money on new fabrics. And with the endless variety of patterns and colors available in men’s ties, each bag you create will be completely unique.
So why not put those old ties to good use and create something beautiful and meaningful with this upcycling sewing pattern? It’s a great way to show off your creativity and make something that will be treasured for years to come.
SECTION ONE:
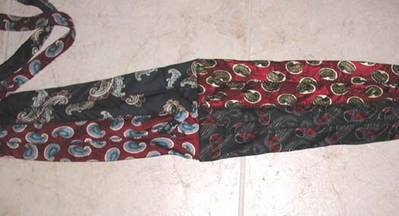
Let’s start with the gusset/handle:
you’ll need four ties:
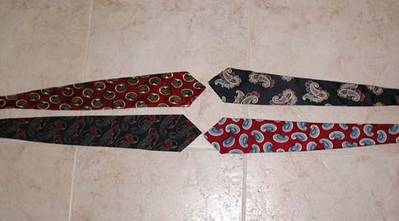
(Figure 1)
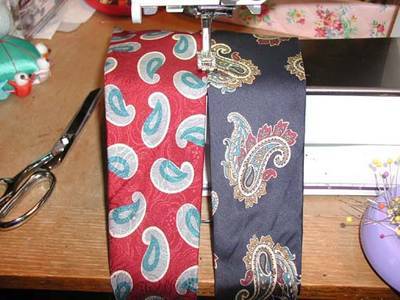
Lay them out like this. Measure up each tie halfway and mark with a pin. These pieces are joined together in pairs halfway up with the top parts left loose.
Join each pair side by side with a super-wide triple zigzag stitch. This is the number 7 stitch on my Bernina Artista 165. Most fancy machines have a similar stitch. If yours doesn’t, you can use a regular zigzag with heavy thread for a similar result.
(Figure 2)
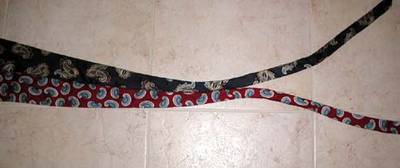
Just feed the ties through side by side, no “right sides together” or pinning or anything.
Stitch each pair together side by side halfway up. Leave the tops free. When you reach the halfway mark, do a bartack to secure.
(Figure3 )
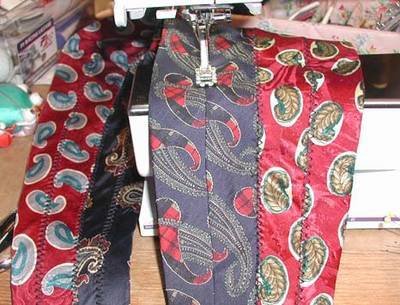
Now you have have two pairs of ties sewn together. Flip them over to the wrong side. See the seam on the back of the tie? See how it is hand-basted? Well, after making HUNDREDS of necktie projects experience has shown me that these tend to come loose with wear. So we are going to take care of that right now. Do not skip this step. No cheating.
Just do another triple zigzag over the center of each tie following the center seam on the wrong side. You can do the entire tie or just halfway up. Either way is fine but no cheating. You will regret it….and I’m watching….
(Figure 4)
Now place the fat ends of the ties right sides together and stitch across with a regular straight stitch. Fold back the little triangles and stitch them down as well.
(Figure 4)
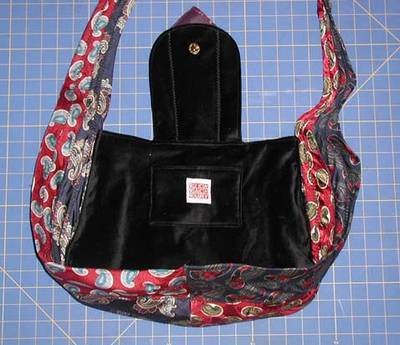
Your gusset/strap piece is now complete! The center of this piece where the fat ends of the ties are so neatly sewn will become the center bottom of the bag. Get it?
SECTION TWO:
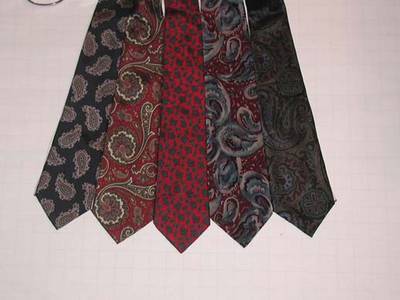
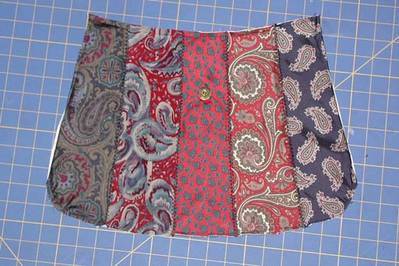
Now we are going to make the pattern for the front and back of the bag. Select five ties from your stash. Arrange them in a pleasing order. Don’t try too hard. Okay. Place them on the large piece of paper with the sides touching. Line up the center tie with a straight line on the graph or newspaper.
(Figure 5)
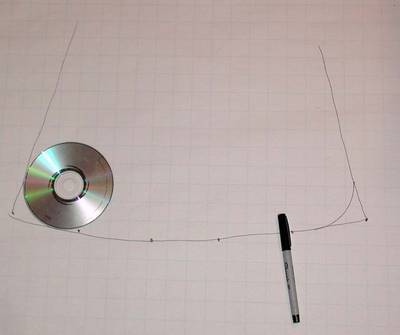
Now mark a dot at the inside points between the ties. Trace the slanting sides of the outside ties as well.
Remove the ties and connect the dots. Decide how tall you want the bag to be. Mine is about 12 inches. Draw a line across the top. Trace a “junk” cd to curve the corners. Oh….Did I forget to put “junk cd” in the supply list? Sorry!
(Figure 6)
Cut this pattern out. Fold it in half. Trim the sides and bottom to make the shape symmetric. Cut a “smiley” shape out of the top (see photo.)
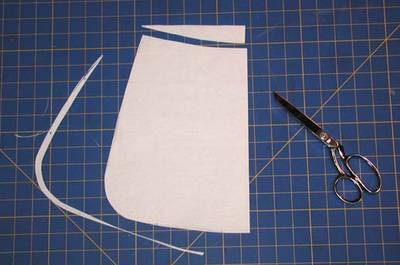
(Figure 7)
Unfold paper – Voila! Behold your pattern.
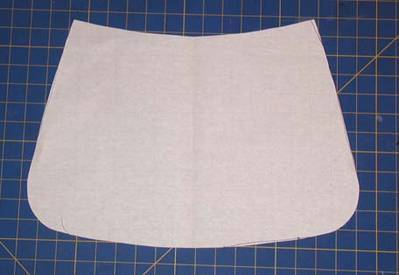
(Figure 8)
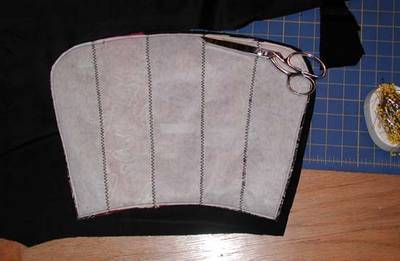
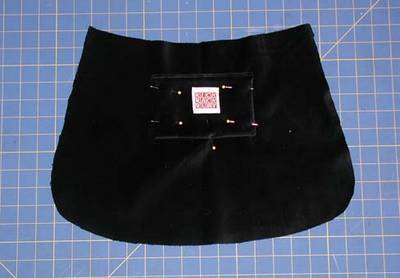
Cut two of these from the heavyweight stabilizer.
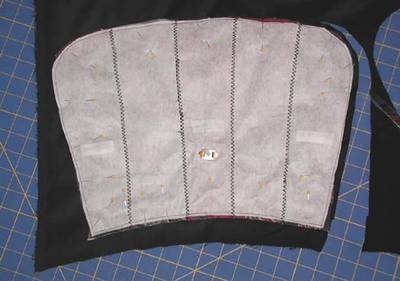
Fold the stabilizer in half to determine the center. Mark with pencil. Align the center of the middle tie on this line. Pin this tie securely.
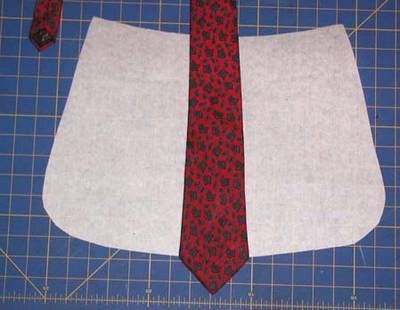
(Figure 9)
Add remaining ties. Cut them all off well above the stabilizer.
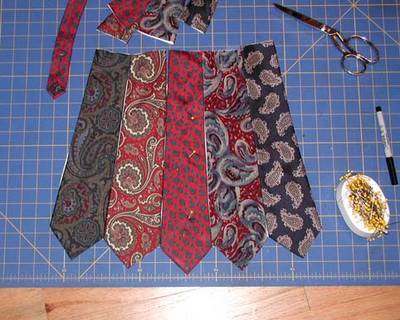
(Figure 10)
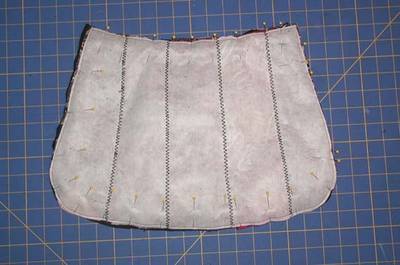
Stitch the ties to the stabilizer with the famous triple zigzag.
Stitch from the front but here is what the back will look like when you are done. Stitch from the front. Not the back. The front.
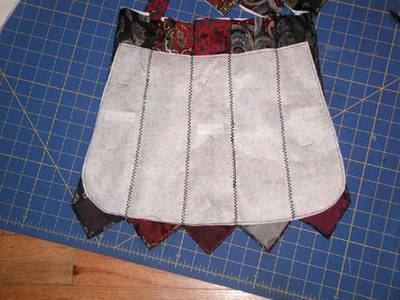
(Figure 11)
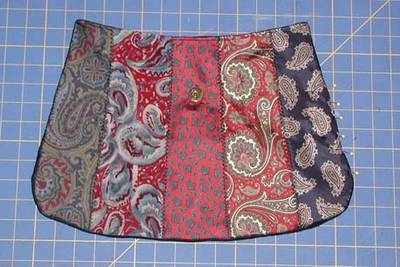
Now trim off the ends and the tops. Pin and stitch all the way around about 1/8 inch in from the edge.

(Figure 12)
Repeat this section for the back of the bag.
SECTION THREE:
Now we are going to make the flap. Cut your pattern about 6 x 8 inches. Round off two of the corners with the junk cd.
(Figure 13)
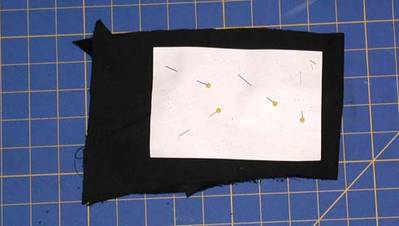
Cut one flap pattern from heavyweight stabilizer.
(Figure 14 )
Place stabilizer on the wrong side of the black velveteen, pin, cut out and stitch about 1/8-inch in from the edge.
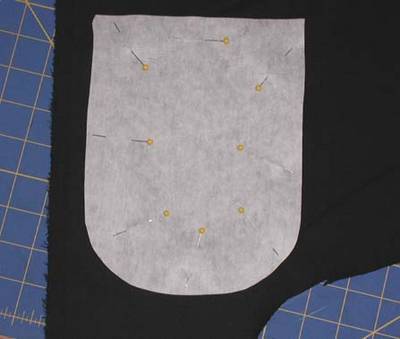
(Figure 15)
Install the “male” part of the magnetic snap to the flap.
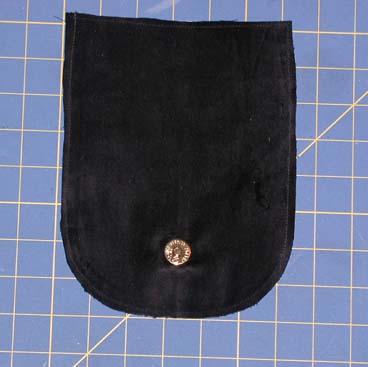
(Figure 16)
Now place this piece right sides together on another piece of velveteen. Cut out, pin and stitch around the flap leaving the top straight edge open.
Sorry about the blurry image.
(Figure 17)
Trim seam allowance, turn to right side and top stitch all around the edge.
(Figure 18)
Choose another necktie to decorate the flap. Center and pin it to the top of the flap. You should still see the magnet on the back.
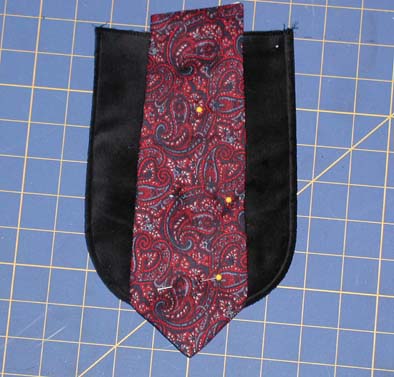
(Figure 19)
Pin securely and stitch down the sides with the triple zigzag. Add a bartack at the end to secure.
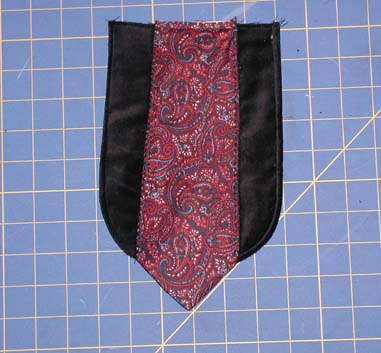
(Figure 20)
This is the back.
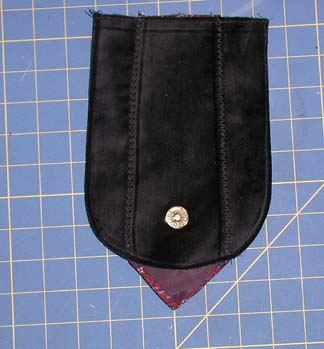
(Figure 21)
You have completed your flap. Time to take a nap.
SECTION FOUR: The pocket
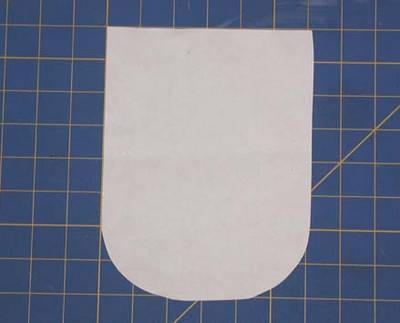
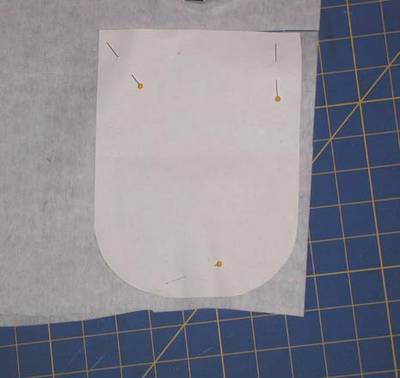
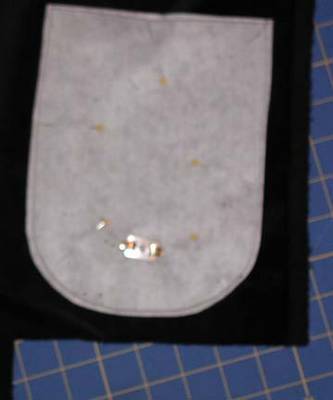
Time to make a pocket! I use a large index card as the pattern for this.
(Figure 22)
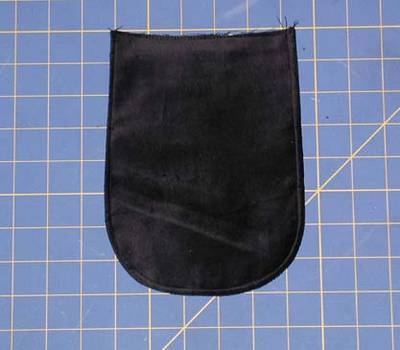
Cut two rectangles, sew with right sides together, leave opening, turn, top stitch the top edge, add tag and yada yada yada – pocket!
Now to review – we have one long gusset/handle piece, a front and a back, a flap and a pocket, right?
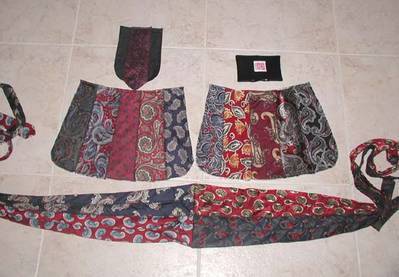
(Figure 23)
SECTION FIVE:
Now we will line the bag. Ready?
We’ll start with the back. You’ll need the back piece, the flap, the pocket and the lining fabric. Use the back piece as a pattern to cut out a lining piece slightly bigger than the back.
(Figure 24 )
Center and stitch the pocket onto this lining piece.
(Figure 25)
Center the flap right sides together on top of the back piece, pin raw edges together. Pin back lining piece right sides together to back piece with flap piece in between.
I know you can’t really see the flap but it’s in there I promise!
(Figure 26)
Stitch around the edge leaving an opening for turning. Trim seam allowance and turn to right side. Top stitch top edge. Pin opening closed.
(Figure 27)
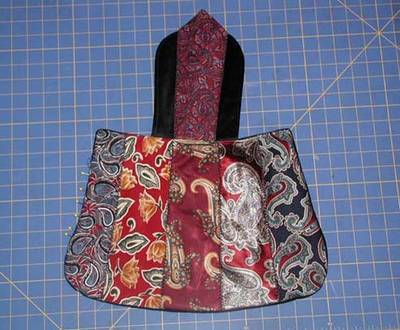
Starting at the center bottom, with right sides together, pin gusset/handle piece to edge of bag back.
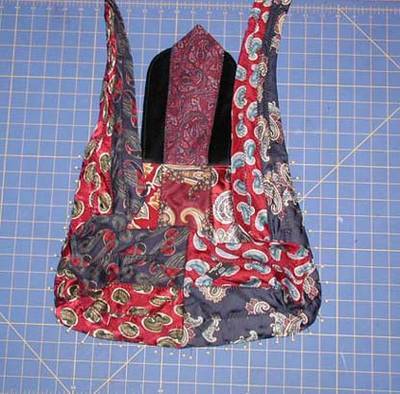
(Figure 28)
Stitch around edge, back stitching at ends. This is the inside.
(Figure 29)
Now install the female part of the magnet on the center front of the bag.
(Figure 30)
Cut a lining for the front piece.
(Figure 31)
Pin and stitch leaving an opening for turning. Turn to right side and top stitch the top edge. Pin the opening closed.
(Figure 32)
Starting at the center bottom, pin the gusset/handle piece to the bag front.

(Figure 33)
Stitch around the edge, back stitching to secure.
Turn bag right side out – and voila! You have a beautiful Neck-tie bag!
Now, if your ties reek of cologne/cigarette smoke/must and dust – I’d like to recommend a home-dry-cleaning product called Dryel. I use this for all of my necktie projects and it works like a charm. Have fun!
This project was contributed by Laura


Beautiful! Thanks for sharing!
sorry it is elzabe again. i made the ”schoolbag” for me a knitting bag, but you dont say anything about the handles at the end, or did i miss it?
i am in south africa in corona lockdown. i have loads of ties and have been looking for a way to use them. i love your tutorial and the style you write. keep it up and keep us entertained
My dad passed away and I used his old ties to make bags for my nieces along with vintage fabric that my mom had. They turned out great and are a great keepsake to remember him.
The pattern works well. Resulting bag is beautiful.
You can print the pattern: Just highlight and copy, past into MS Word and print. Takes about 24 pages however so you might want to go back and delete any irrelevant content to save space. I already tried it so I know it works. I wanted to print it at work and take it home with me.
You can also just login and then click the print button. That prints it in a nice format without the ads and much less pages!
How are the ends finished off for the handles?
for one of them I put a belt buckle on & just put rivets down the other side so that it was adjustable.. Also, for one I just used a knot that could be adjusted to the person’s liking. Next one I think I’m going to try “D” rings & see how they hold up. otherwise just sewn together at the top to what length you prefer & it looks great too. I didn’t butt them together but rather laid them on top of the other side & sewed down the edge of the ties laid one on top of the other. If that makes sense. I wish I could share a pic of some of mine!
They really came out cute & I love the pattern that was shared here! I made my first one as a trial becuz my niece’s father-in-law passed & she came over with tons of his ties to make ‘Memory’ purses for his wife & daughter. I barely mend clothes & had not much experience on a sewing machine. She told me that they loved them. I felt kind of blessed to give them something that helped them think of him even tho he was gone..
i love this i was at a second hand store the other day and bout about 15 ties for this purse.. but i do have a question.. when and how do u sew the skinny part of the handles together??
I love it! II made my 1st purse & didn’t realize that It would end up being as large as it was. All i did was follow all the instructions but only used 3 of the front panels ties. The back panel was made using the scraps left from the front. After you’ve sewn the ‘handle/ gusset piece if you DON’T cut it off it’s a good shoulder bag, they hang to ab the hip.
Sorry about my ‘poo-poo’ comment! I would love to have anyone explain to me what it is I’m doing wrong 🙁 I’m just lost here. I’m a beginner ‘sew-er’ ! LOL More education is a must!
Not meaning to be a buzz-kill but after making the front of the purse I found that the remaining ties aren’t a sufficient size to fit together for the back, which makes sense because they are in a ‘V’ with a wide end & a narrow end. The only way I was able to fit the pattern was to make piece it with alternate wide & narrow ends.
I’m not too experienced & I’m sorry but the math of the project with these ties is practice. My niece lost her father-in-law & wants me to take his very expensive silk ties & make a couple purses for her mother-in-law & sister-in-law.
The way I figure, its going to take me 14 ties to make this purse because you have to cut off most of the wide end for the 12 inch tall panel. and the flap wont be from the wide end if I want to keep a point for the flap.
I have made this purse , but I want to make another smaller one tonight – to wear tomorrow. I was hoping I could print the pattern . Thanks. Vivian
Can.t wait to try it!!!
Very well done instructions. I’m a visual/hands-on learner, so the pictures were a great help. I will try this pattern. Thank you!
Awesomely cute, I love it, will make a nice big purse for my mom who uses “Depends.”
Also if you don’t have a man who wears ties around, thrift stores are loaded with ties.
just loved tie purse! also, thanks bunches for the dry cleaning product, Dryel. how generous for you to share—truly appreciate your dedication.
Thanks for the inspiration, I have been holding on to my Grandpa’s ties, waiting for the right inspiration to make something special. This just might be the year to make something happen. Thanks again.
Being a visual learner it turned me off that I would have to constantly search through the photos and guess which one went with each step. I also agree with those who commented re: finishing the top of the strap…is this up to personal preference?
Sweet!
This is a very pretty handbag. I would like to make this. Of course I will have to find some old ties somewhere first. A wonderful idea for Dad’s and Granddad’s ties. I love it.
this was fun and easy to do, thanks for doing all your hard work.
because the ties back seam is over lapped, would only a single stitch line be enough strength – instead of zigzagging? i will try this next time. worked great with my purse organizer too.
Have a wonderful life
I made this bag two times using my late father’s ties. One was made with all his Disney ties and the other one with all his Looney Toons ties. They turned out beautifully and I get lots of compliments.
Once I made the first purse, I understood the directions much better, however I did make a couple of changes to make them my own. I used my husband’s old ties for the first purses I made and I plan to give them to my daughters for Christmas. Two friends recently lost their husbands and I used their ties to make purses for them. They love them!!! Now that I am out of ties, I plan to make a trip to the St. Vincent de Paul and/or Goodwill stores to buy more.
I made a bag like this years ago and when I first saw the pic I thought it was mine!! 🙂
I made this bag out of my late husband’s ties, I now have a unique bag that will bring special memories every time I use it. x
My husband died last year, he only wore a tie on special occasions; I not only have a unique bag but one that will remind me of the special times we shared every time I use it. x
I made this bag. I took it to church to show it off and now I have requests from the teenage girls wanting one for school. We have a GoodWill Pound store, everything is sold by the pound. I bought 50 men’s ties for S10.00.
Next project will be a skirt for my daughter and a Christmas tree skirt for church.
Just made this bag,it was easier than I expected,the explanations were great ,
took me 2 days from start to finish. Everyone remarks how unusual my bag is, so thank you again, will upload a photo soon as well
1
This looks beautiful and seems like a wonderful project, but the pictures are very out-of-order and very confusing!
Thanks for sharing this project – your directions were great, easier to make than expected and it turned out beautifully – my friends were impressed! I wasn’ sure how the handle ends was finished, tried tying it but too much bulk & loose ends, so cut & stitched – looks fabulous!
The order of the pictures was confusing, but the end result was fantastic. Getting lots of compliments on my bag. I carry it every day!
very cute! will try to make one. thanks!
This is a very cute purse! I’m entering this for the county fair. 🙂
very good. tnx
I’m going to do this for a 4-H sewing project, such a cool idea!!:)
great idea! btw my dad have a lot of ties, so I will make it 🙂
This is really nice. Gotta get some ties.
over in new zealand, wellington, country road bags are really popular, but i’ll give this one a try…
i love it!! the only problem seems to be quantity of ties, and how the pictures aren’t really labled figure one or figure 26
OMG! I love this bag, I made one for myself and my friends all wanted one too so they collected the ties they wanted and I made them each one too! Such and awesome bag! Thank You Sooo Much!!!!
I’m about to make this for my sister from my grandfathers (who has passed away) ties..i think its a great idea so she can use and see them everyday instead of sitting collecting dust in a closet! 🙂 thank you!!
OMG this bag looks exactly like my friend floss’s! And that costs loaadds xx 😀
This is awesome! Now I want to raid my hubby’s tie collection!
This is so cool.
good step by step instuction
It is amazing , my husband had many old ties , I will start to do so.
This is the best bag I have and it suits everything!!!!!!!!!!!!!!!!!
Wow..This project looks amazing! Now I am going to be on the lookout for some old ties! Thanks for the great project..Elaine in NY
This looks a great project. The pictures are awesome but seem to be out of order.
I was given a big box of ties when I dropped off articles at a clothing drive.
Its cute, but I’m wanting to leave the points at the ends of the ties. Would there be a way to do that and still have the bottom like yours?
this is way cute! I can’t wait to start making them for my friends! Thanks bunches!
OMG so cute!!! Psh forget getting a normal bookbag from Target, or TJ Maxx, I want a unique one. Would it look nice if i did rainbow ties? or should i just stick to colors that are close to each other? all my friends will be jealous 😉
anyway, i love it, imma get started on it right away!
<3
I LOVE THIS PROJECT!!! I tied the handle ties in a square knot to join them. Works well for me. Now my 3 granddaughters want one too.
Just finished mine!!! Looks ace!! Bought all ties from charity shops.
Oh man, that is one cute bag! Makes me wanna go buy cheap ties at the thrift store like I used to do in college . . . 😀
oh my god, what an adorable bag! It only took 2 hours to make and I picked up the ties for 50 cents each at the op shop and made it for my friend. I used the cut off ends to weave together to make the other side of the bag so I only used 10 ties, not 15
LOVE this, it’s fabulous. Thanks so much for sharing it with us. Cynthia
who has that many ties???? cool anyway
how many ties is a bunch of ties?
REALLY COOL
Love this design and directions. Thank You for sharing. Diane
Great bag! Thank you for letting me know about this useful site. I waistcoat is done, but I’m not sure I’m happy with it. It’s first try and I haven’t given up. Your work is encouraging!
Best,
Eline
I love working with old ties. I made a full length dress out of them!
awsome sooooo cute
thamks
This a great project i made 4 of them for my grandaugthers from there granpas tie who passed a couple years back they love them dont thing they use them but hang then on there bedroom wall
I made two purses, then wondered what to do with the remaining pieces of ties. It took a trip to a craft show where I saw a rag rug. “!!!” Problem: the ties do not line up evenly. I tore it apart twice, no dice. So the rug is not evenly square. But my dog loves to sleep on it anyway.
I made this bag. Using only ties i got from my dad and grandpa i now have an awesome bag. Not only do i use it for school but it is a good every day purse. Not only does it have sentimental value but it is also functional.
I made it! its awesome!! Not quite big enough for me to use as a school bag, mainly due to the fact that I usually have a lot of homework….Im sure I could find another use for it though! Great Idea and thanks for sharing!
Oh man, this is such a fantastic idea!! I think i am going to sart stright away!!! Can’t wait till it finishes so i can give it to my cousin for her birthday!!! I love the easy to follow instructions and pictures!!! Although i was a bit puzzled about the handles, overall a very neatly put-together project!!! Well done to the inventer for going green by recycling the ties!!
Awesome! Im sure my dad and grandad have LOTS of ties I could use. Ive been looking for a project like this just for that reason. You didnt include what to do with the handles… so I will assume that you just sew them together at the ends? Great project!
Wonderfully easy to follow instructions, I enjoyed making this bag and it has been taken up as a project at my patchwor class, but you dont say how to finish the handles
Wow, I really like this project!
This is amazing! What a great idea to do with those old ties! I think I will try this. I have to get some ties, though. Goodwill here I come!
This is adorable – I can’t wait to make this for my niece! 🙂
what a great idea! can’t wait to try it!
LOVE this idea! cant wait to make it! just need to get some ties
The supplies said a bunch of ties so I got 30 now I know A bunch=15! oh well I can make two! also beware that ties come in different widths so that is something to keep in mind when putting together a tie collection. Instead of zig-zagging the ties together I’m using my machines wide decorative stitch with silver thread. It gives the bag a different look.
is it possible to not use lining and to sew it by hand?
Made this twice. I use an older Singer, had problems because the needle cannot be raised high enough to sew through the corners. Hand sewed those. What does top of handle look like? No picture, no instruction, I joined it, and it doesn’t look right.
Only complaint that is the zig-zag stitches will look un-professional if they are not done small and neat. Other then that I can not wait to try this one!
LONG TIME TO MAKE BUT COOL.
This looks gorgeous. For those who don’t have any ties to use, you can find them at the thrift stores. You might not find all you need (or like) in one trip, but just pick up a few at a time.
Great idea!
that is awesome. it looks cool but my dad doesnt wear ties so i dont have any neck ties to make it
very nice…would love to try it.
very good
This is wonderful project, I have ties from grandfather’s (deceased)and it will be a neat project to make for granddaugters as a wonderful memory of them. Directions are wonderful, thank you for such a cool recycleable iand “going green” idea!! DP
I have been looking for an idea to useabag of tiesgiven to me. Some of them have been taken apart though thanks
cool
its cool i’d rock it like no tomorrow!
This is a fantastic pattern!! A wonderful Christmas idea that i can’t wait to make. Thank you for sharing!
I love this! Thank you!! I was going to try to come up with a tie purse on my own, now I don’t have to! Thanks for the thorough instructions!!
my fahter passed 3 yrs ago and I have alot of his railroad ties what a wonderful way to remember him with
ooh i would like to make it i hope it exceeds because I ‘m not that good in sewing
For the straps, you could tie the ends together in a decorative knot.
Really beautiful and classy. A lot of work, but it’s unique and sooo attractive.
Really beautiful and classy. A lot of work, but it’s unique and sooo attractive.
what a great idea
Best use of neckties that I’ve seen in a long time. Excellent workmanship!
This is so cute only I would use colorful ties. Also I have seen ties used to make a really cute skirt!
I understand that the gusset makes the handles, but do you just sew them together?
I love this idea, very creative,and lots of different coloured ties would be cool! 🙂
loooove it!!
wow, cute and original, I am going to look great when I go back to school now!
This was great fun to make… I didn’t follow exactly, but it still turned out well. Instead of using that many ties, i used 9. 4 for the handles, 5 for the front cover. I then used the scraps from the front to make the back in horozontal lines.
Kudos
cool
looks like a ton of fun =] cant wait to try it out this summer!!!
I like this bag
it’s cool
but it looks realy hard to make
i cant wait untill i make it .
Thanks – this is just what I was looking for and the instructions are easy to follow. Judy
I love this!! I have made 2 already and it has inspired me to create my own neck-tie bags!! Your pattern & pics were very easy to follow, a great tut!!
i LOVE this project! im so going 2 make 1!
maybe ill use only 6 neckties and make a purse! sooo cute!(my dad has more neckties than my mom has shoes, so i bet he could spare a few!!)
I did not see any response as to how to finish off the straps, can the answer be posted?…My bag looks fabulous, thanks!
Love it. Thank you for this idea!
it very trendy and o so fashionable. and i already made my own phone pouch from my dads old ties!
it very trendy and o so fashionable. and i already made my own phone pouch from my dads old ties!
The Gusset forms the straps.
Have made mine from my grandads ties, but, have I missed how to finish the straps???? Please help me!!!!!
Did I miss something?? How do you finish off the top of the straps??? Great pattern! I am ready to try!!
Awesome use of old ties!
great pics! makes everything easy!!!
i LOVE THE PROJECT…but I’m not very fond of the paisly ties. This is a really awesome idea though….and very creative *****
That is so cool! You’re so creative!
sooo cool thank you vey much!!! loved it and it came out lovley!!
so cute! would be cute to make a bigger messenger bag for my male cousin for school 🙂
OH MY GOD! I LUV THIS IDEA!!!! this is so great! i showed it to my friend and she fell inlove with it:D lol
This is so cool i am 15 years old and i was wondering if you have ever made a vest with neck ties? I love this idea with the bag so I am going to try this too. Thank you. 9-8-07
so cool, want to try! WOnder if my dad will let me “borrow”some ties!
just wonderful – can’t wait to try this!
That’s so snazzy! I’ll have to make one! 🙂
this is a really neat idea, but i don’t think if i have the patience to make something this cool. lol.
The directions were very good with lots of details. This project will be easy to follow. I like that idea. Any one can get rid of old ties that are out of style or that they never liked much. The bag was beautiful. My hats off to you. Very smart looking.
Awesome! You have a great pattern and it is so well put together.
i need a cool bag for my 13 yaer old dater so she can carry her books arond at school
Very creative!!Thanks for sharing
this is an awesome idea!!!! I would never have thought to make a bag out of ties!!! thanx 🙂
great photos easy intructions thanks for sharing
How do I finish the handles?
we made the purse and the instructions made it easy, we got our ties from salvation army
Hello, I am waiting to hear how to finish the handles. Thanks
Hello, What a great idea! I am getting prepared to make one. In figure #3 you say to zig-zag on the back of tie seam. I do not see any of that stitching in figure #10. Also, how do you complete the handles???? Thank you. 2-11-07
very creative and nicely finished inside and out!
I love the look of this bag! Could you explain what a heavy weight stabilizer is? I really want to do the project, but I need to know what that is! thanks again for the cool looking bag! 🙂
I love this idea! Now to get my dad to give me some ties…. 😉
I love this idea! Very unique!
You did a fabulous job of designing and makin gthis pattern !! You are very talented! I have done the same with ties to make a bag that is more like a tote.. but this pattern is wonderful!! Thanks for sharing your talents!
I haven’y tried it yet but the directions seem clear…and fun!
how do I finish the handles?
I’m a beginner at sewing and this looks really hard. Any way you can break it down and make it ALOT easier? It’s really cute and I want to learn how to make it.
My dad just passed away last week and had lots of ties. This will make a beautiful keepsake! I’m going to get my husband to sew one for me and my daughter. Thank you!!
My daughter made one of these, but, what do you do with the strap “handles?” It’s really neat!
Love the idea! Friend’s husband died suddenly so am making a bag each for her two teenage daughters out of his old ties. Thank you for the idea and instructions!
i love this idea,im 12,and i will probably make this for my 8th grade bookbag!!!!LOVE IT!!!!!josie
oooooh, finally a pattern to start a diaper bag for me, Mrs. picky about baby trends. I might make one for all of my freinds that are expecting , NOT TO METION MY HUSBAND WOULDN’T MIND CARRYING THIS ONE AROUND.
This is so fabulously awesome…like the old suit jacket and necktie messenger bag on crafster.
super good idea, how many guys do i have to date to make a bag…just kidding!
How lovely, I am going to run right into my sewing room and make one!
Dianne
Great idea – I wonder about the black velveteen – in my world it would be white immediately with all the lint, etc.
So cute! I’m making a purse version of this. Instead of 15 ties, I’m using 9: 3 for each side, 2 for the handle, and 1 for the flap. I got the ties at a 99cent store in the Flushing Mall called Banzai!
I haven’t sewed at all since middle school home ec, but made this bag in two afternoons! It’s awesome, I love it!! Thanks for the pattern!
wow tht is realli cool i am 14 years old and i realli like to sew i just kinda create my own designs i have made purses and pillow case and blankets and lots of other stuff but this purse looks kinda difficult so i think th i am just gonna stick to the st
that is really awesome
The bag is GORGEOUS!!
I want. x
Rummage sale, here I come! Neat.
i think it’s cute purse
this looks so cool! but um, what’s heavyweight lining and where do you get it?
Thats so cool!
Oooh, I made a skirt from ties long, long ago… I supposed I’d better make one of these to match!
made it. love it.
omg, SO creative! I love it!where do you people come up with this stuff?!
its me this is so cool
OMG!! so cool
FABULOUS!!!! Can’t wait to try it myself! Yours looks STUNNING! what a great use of ties!
I made this bag, but altered mine in areas the tutorial left out. It inspired me to make other types of necktie crafts! I’ll post completed pictures on Craftster.org>neck tie book bag (3/14/2006)
my mother is just as crazy as you. Shes planning to make it…………. will keep you posted in 15 months time
from the potetnial and wearied user
I haven’t tried this yet, but my husband just cleaned out his closet and had old ties to get rid of. I can’t wait to try!
I have so many neckties that i got at a rummage sale and wondered what to make with them other than a quilt. This is a wonderful idea and would make a great Christmas gift!! I must do this!!
What a clever idea!! Now to find some neckties!!