
Unlike real stone beads, polymer clay beads are easy to shape, drill, and bake right at home. You can create smooth river-rock styles, marbled stone effects, or even glossy polished finishes. The result is a bracelet that looks like authentic natural rock but feels comfortable and wearable for everyday style. Perfect as a DIY gift, a nature-inspired accessory, or an eco-friendly alternative to store-bought jewelry, this craft project will quickly become a favorite.
Get more details about this project
What you need
Polymer clay in natural earthy shades (brown, tan, ochre, gray, or marbled mixes)
Stretch cord or elastic jewelry thread
Craft knife or clay blade
Needle tool or skewer (for piercing bead holes)
Baking tray and parchment paper
Oven (for curing polymer clay, follow package instructions)
Scissors
Jewelry glue (optional, to secure knot)
Instructions
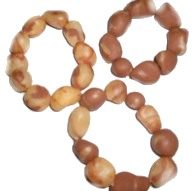
These Natural Pebbles are very simple to make and look fantastic. You can make the chocolate with white marbling or the white with chocolate marbling.
1: Start by working your clay till it is soft and pliable. Work the white before the brown or you will transfer the color with your hands.
2: Divide your main color clay into small rounded balls, for this project I used 11 balls. To work out how many balls you will need measure your wrist and make enough balls to meet that length.
3: Make sure your balls are not all identical cause remember rocks are not perfect. Now add small amounts of your marbling color randomly over each ball then roll it again. Once it is nice and flat to achieve a marbled look TWIST the ball to twist in the color and roll again. You made need to do this a few times to get a true marbled look.
4: Take a single rock in your finger and PRESS it into a rock like shape between your fingers.
5: prepare your bead for baking by threading it onto a wire skewer or spare length of wire. Make sure the beads are not touching each other or they may fuse together whilst baking. Bake as per the instructions on your clay packet and then allow to cool. You can varnish the beads whilst they are still on the wire skewer for easiness.
Once it is varnished use your elastic thread and thread up the rock beads. And you are finished. These make great little gifts.


Great project!
Cute! Good way to use scraps, too. Also, in case you haven’t seen it yet- Fimo or Sculpey actually has stone accent clay in a variety of colors including browns and greys.
Colored clay can be found at craft stores, art supply stores, and even chains like Wal-Mart and Freddy’s.
Thanks!
they look like chocolate…i’d use a darker brown and make it look like marbled choc…emmm tasty!
This looks cute!
Where could I find the clay?