
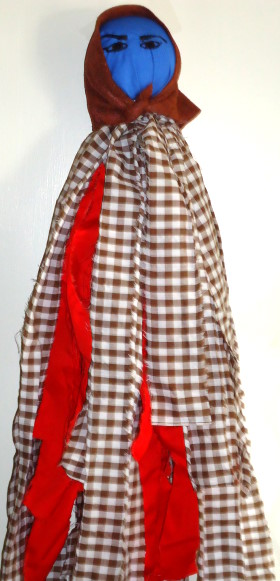
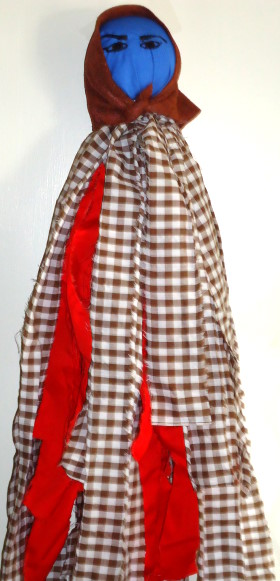
A square of blue cloth forms the face, a triangular kerchief becomes the hood and approximately 50 torn fabric strips are tied around the neck. When the doll is hung near a sheltered doorway or window, the strips move freely in the breeze.
The project can be approached simply as a folklore-inspired decoration or made as a symbolic reminder of resilience, protection and weathering life’s storms.
Get more details about this project
What you need
Natural cotton balls or cotton batting
Small amount of dried rosemary, lavender or bay leaf, optional
1 clean sock in any size
Several strong rubber bands
Strong string or cotton cord
Square of solid blue fabric
Approximately 50 fabric strips in assorted colours or prints
Large triangle of brown fabric for the kerchief
Scissors
Hand-sewing needle
Black embroidery floss or permanent fabric marker
Embroidery floss, yarn or strong cord for the hanging loop
Small plastic bag, optional for moisture protection
Instructions
The name “Storm Hag” appears in different stories and modern magical practices, sometimes connected with wild weather, winter, transformation and feminine strength.
This project is a contemporary folklore-inspired craft rather than a historical reproduction. You can make it as a seasonal decoration, a symbolic household guardian or simply an expressive scrap-fabric doll.
The doll cannot provide physical protection from severe weather. Always follow official weather warnings and emergency advice.
Introduction
There is something wonderfully dramatic about a decoration designed to move with the wind.
The Storm Hag’s body is made from long torn strips rather than a traditionally sewn dress. The strips can be cut from worn clothing, gingham, quilting remnants or other lightweight fabric scraps. When the doll is displayed in a sheltered outdoor area, the loose ends flutter and twist.
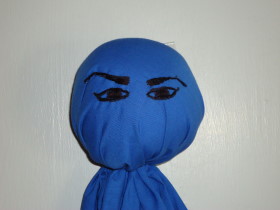
Her face is deliberately simple. Strong, watchful eyes are the main feature, while a brown triangular kerchief frames the head.
Choose blue and grey materials for a stormy appearance, red for strength and warmth, or fabrics that carry a personal meaning for you.
Instructions
Step 1: Prepare the filling
Place a large handful of natural cotton balls or cotton batting in a clean bowl.
If desired, mix in a small quantity of completely dried rosemary, lavender or crumbled bay leaf. The herbs are optional and should remain enclosed inside the doll.
Choose herbs that are safe for your household. Avoid ingredients that may cause allergies or present a risk to children and pets.
As you prepare the filling, you may choose a personal intention for the project, such as resilience, calm or a safe and welcoming home.
Step 2: Form the sock head
Push the cotton-and-herb mixture into the toe of the sock.
Pack the filling firmly enough to create a rounded head, but do not stretch the sock so tightly that the fabric becomes thin.
Shape the head with your hands.
Twist a strong rubber band around the sock directly beneath the head to hold the filling in place. This narrow area will become the neck.
Step 3: Add optional moisture protection
If the Storm Hag will be displayed in a sheltered outdoor area, slip a small plastic bag over the stuffed head.
Gather the plastic beneath the head and secure it with another rubber band.
Trim excessive plastic below the band, leaving enough material that the covering cannot pull loose.
This provides limited protection only. The doll should still be kept out of direct rain and brought inside during severe weather.
Skip this step for an entirely fabric-based indoor doll.
Step 4: Cover the face
Cut a square of solid blue fabric large enough to cover the front and sides of the head.
Smooth the fabric over the stuffed sock, keeping the blue surface as wrinkle-free as possible across the face.
Gather the excess material beneath the chin and secure it at the neck with a rubber band or strong string.
The lower edge will eventually be concealed beneath the fabric-strip body.
Step 5: Create the watchful eyes
Decide where the eyes will sit before marking the fabric.
Use black embroidery floss to stitch two strong eyes and brows onto the blue face. Make the eyes the most prominent feature.
A long central line or simple pointed nose shape can be added if desired.
If you prefer not to embroider, draw the features with a permanent fabric marker. Place a piece of scrap paper beneath the blue fabric if possible to prevent ink from bleeding into the stuffing.
Keep the expression serious and watchful rather than adding a smile.
Step 6: Prepare the fabric strips
Tear or cut approximately 50 strips of lightweight fabric.
Make each strip approximately 1 1/2 inches or 4 cm wide. Vary their lengths between approximately 12 and 20 inches or 30–50 cm.
For a look similar to the original doll, use mostly brown-and-cream gingham with several bright red strips mixed through the bundle.
Torn edges create a ragged, windswept appearance. If your fabric will not tear cleanly, cut it with scissors instead.
Remove excessively loose threads that could tangle or shed.
Step 7: Arrange the strip body
Lay the doll on the work surface with the face upward.
Arrange the fabric strips around the neck, distributing them evenly across the front, sides and back.
Mix the colours as you work so the contrasting strips are visible throughout the body.
The strips should hang directly from the neck. Do not create a separate torso, arms or legs.
Continue adding strips until the bundle looks full from every direction.
Step 8: Tie the strips securely
Cut a long piece of strong string.
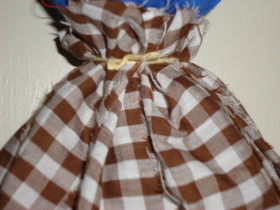
Wrap it tightly around the doll’s neck and fabric strips several times. Check that no strips can be pulled free easily.
Tie the string with a secure double knot.
For additional strength, wrap and knot a second length of string over the first.
Trim the ends or leave them long enough to blend into the ragged body.
Step 9: Make the kerchief hood
Cut a large triangle from brown fabric.
Place the longest edge across the top of the doll’s head. Bring the two side points down around the face so the fabric forms a hood.
Tie the points beneath the chin or wrap them around the neck and knot them at the back.
Adjust the front edges so the blue face and watchful eyes remain clearly visible.
Hand-stitch the hood in place if it feels loose.
Step 10: Add the hanging loop
Thread a hand-sewing needle with strong embroidery floss, yarn or cord.
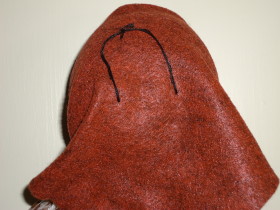
Sew the cord securely through the sock fabric at the back of the head. Do not attach it only to the loose hood fabric.
Create a loop large enough to fit over a hook.
Stitch through the sock several times, then knot the cord firmly. Gently test the loop before hanging the doll.
Step 11: Finish the fabric-strip body
Hang the Storm Hag temporarily and examine the arrangement.
Move crowded strips to fill any thin areas. Trim a few ends if the body appears noticeably uneven, but retain the loose and ragged overall effect.
Make sure the red strips remain visible between the gingham.
Check the neck tie, hood and hanging loop once more.
Step 12: Display the Storm Hag
Hang the finished doll indoors or in a dry, sheltered location near a door or window.
Allow enough clear space for the fabric strips to move without catching on hinges, candles, plants or other objects.
Bring the doll inside during rain, strong wind or severe weather.
Optional Intention
If you enjoy adding symbolism to handmade projects, choose a short phrase to repeat while tying the fabric strips.
For example:
“By cloth and thread, through wind and rain, may this home hold warmth and strength.”
This is entirely optional and can be replaced with any wording that feels meaningful to you.
Safety and Care
This Storm Hag is a decorative item and not a toy.
Keep rubber bands, dried herbs and loose strings away from young children and pets.
Some herbs may cause allergies or be unsafe for pets. Omit them if you are uncertain.
Keep the doll away from candles, fireplaces, heaters and other sources of flame. Cotton, herbs and fabric strips are highly flammable.
Do not leave the doll outdoors during storms. Bring it inside if the materials become wet.
To clean it, gently shake away dust outdoors or use a soft brush. Replace the doll if the filling becomes damp, mouldy or infested.
If retiring an old doll, separate and dispose of its materials according to local waste and recycling requirements. Do not burn synthetic fabrics or bury plastic, rubber bands or treated materials.




Made my storm hag just before hurricane Flo hit NC, years ago, she is still up and protecting our home. One question though…..even thinking of making another main,y cause it has been years.
Should I wait until her power is gone, or make a new one to help her. Also how would I retire her? Bury? Burn?
Should you wait or just make another?
If she still feels strong – If you walk by her and get that solid, “I’ve got you” vibe, you could totally keep her right where she is and make a second one as her sidekick. Think of it as doubling the guard duty instead of replacing her.
If she feels a little worn out – Over time, protective charms can soak up a lot of bad weather (literally and energetically) and start to fade. If she’s looking or “feeling” tired, it might be time to let her rest.
How to retire her with respect
If you decide she’s earned her retirement, the key is to thank her and let her go in a way that feels right to you:
Say thank you – Out loud. Yes, it might feel silly, but it’s important.
Release her energy – You can sprinkle her with a little saltwater or even blow across her to send her spirit back to the elements.
Give her a proper send-off:
Bury her in the garden or by water so she’s back with nature.
Burn her safely if she’s made of natural materials, letting the smoke carry her away.
Take her apart and return the pieces to nature — wood to the woods, shells to the beach, etc.
Making a new one
If you do decide to make a fresh storm hag:
Try creating her during storm season or under a waxing moon — that’s a symbol of growth and building strength.
If you can, add a little piece of your old hag into the new one so her “spirit” carries on.
When she’s done, give her a little blessing before you put her up, so she knows she’s on official watch duty.
Love this idea! And using magical intent for protection is wonderful, as well as the easy design.
I love this idea and it sounds so simple. I’m going to do this with my granddaughters.