
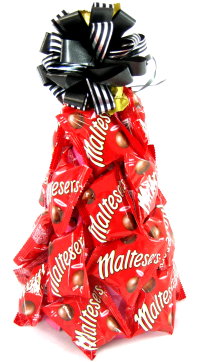
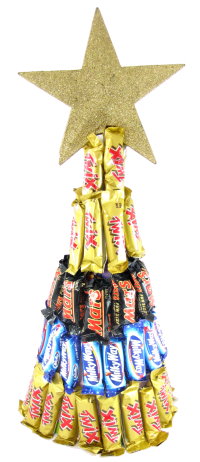
Use chocolates with different wrapper colours to create decorative bands, or choose a single variety for a simple coordinated tree. Finish the top with a large star or ribbon bow.
The tree can be made in almost any size, allowing you to create a small individual gift, a teacher present or a larger chocolate centrepiece for an office or family Christmas celebration.
Get more details about this project
What you need
Card board
Mini size wrapped chocolates
Pins or Hot Glue Gun
Scissors
Star or Ribbon bow for topper
Instructions
Choosing the Chocolates
Use miniature or fun-size chocolate bars that are individually sealed in flexible wrappers. Bars of a similar size will produce the neatest rows, but you can combine several varieties if their proportions are reasonably close.
The original design uses different wrapper colours to create horizontal bands around the tree. Gold, blue, red, green and dark chocolate wrappers all work well for Christmas.
You can use Cadbury chocolates, Mars bars, Twix bars or any other individually wrapped variety available in your area. Check for allergies and dietary restrictions before giving the finished tree as a gift.
The number of chocolates required will depend on the size of the cone and the dimensions of the bars. Buy a few extra so you can replace damaged wrappers and fill awkward gaps.
Choosing an Adhesive
Glue dots or strong double-sided adhesive squares are the safest choices because they do not introduce heat and are less likely to damage the wrappers.
If using hot glue, choose a low-temperature glue gun and apply one very small dot only to the sealed wrapper flap. Never place hot glue over the chocolate itself.
Avoid inserting pins through chocolate wrappers. A punctured wrapper compromises the sealed food packaging and may make the chocolate unsafe to give or eat.
Before You Begin
Plan your wrapper colours before attaching the chocolates. Place the bars into groups and decide how many rows of each colour you would like.
The bottom row determines whether the tree will stand flat. Position these chocolates carefully, keeping the lower wrapper ends level with the bottom of the cone.
Keep all chocolates at a cool room temperature while assembling the tree. Warm chocolate may soften or melt, particularly when handled or placed near hot glue.
Instructions
Step 1: Choose the tree size
Select the cone you want to use as the base.
A small cone makes a lovely individual or teacher gift. A larger cone is better for a family present, office gift or edible Christmas centrepiece.
Make sure the base is wide enough to stand securely when covered with chocolate bars.
Step 2: Make a cardboard cone
Skip this step if you are using a ready-made cone.
Roll a large piece of cardboard into a cone. Adjust the overlap until the cone has the height and width you want.
Secure the overlapping cardboard with strong sticky tape, staples or craft glue.
Trim the lower edge with scissors so the cone stands upright without rocking.
Step 3: Reinforce the cone
Check that the cone can support the weight of the chocolates.
Add extra tape along the inside seam if necessary. For a large tree, insert a second layer of cardboard or fill the lower portion with crumpled paper to prevent the cone from collapsing.
Do not fill the cone with anything heavy, as the chocolates will already add considerable weight.
Step 4: Sort the chocolates
Arrange the miniature chocolate bars by wrapper colour or variety.
Set aside enough of one colour to cover the widest bottom row. Reserve smaller groups for the narrowing rows near the top.
Check that every wrapper is fully sealed and undamaged.
Step 5: Mark the bottom row
Stand the cone on your work surface.
Hold one chocolate vertically against the cone with its sealed wrapper end level with the bottom edge. The chocolate should extend upward, with the wrapper lying flat against the cone.
Lightly mark the height of the chocolate if this helps you keep the first row even.
Step 6: Attach the first chocolate
Place a strong glue dot or adhesive square on the back of the wrapper near its upper sealed end.
Press the chocolate vertically against the cone. Hold it briefly until the adhesive grips.
If using low-temperature hot glue, place one tiny dot on the sealed wrapper flap and attach it immediately. Do not apply glue over the centre of the chocolate bar.
Step 7: Complete the bottom row
Continue attaching chocolates around the entire base of the cone.
Keep the lower ends flush with the bottom so the tree remains stable. Position the bars close together to conceal the cone without forcing them to overlap heavily.
Check the alignment every few chocolates.
Step 8: Begin the second row
Position the next row directly above the first.
Allow the lower end of each new wrapper to overlap the upper section of the chocolates below. This hides the adhesive points and gives the tree a full, layered appearance.
Stagger the chocolates so the bars in the second row sit over the spaces between the bars below.
Step 9: Continue adding rows
Work upward around the cone one complete row at a time.
Keep each chocolate vertical while following the narrowing shape of the cone. Use slightly more overlap as you approach the top.
Press each wrapper gently into place without squeezing or bending the chocolate inside.
Step 10: Change wrapper colours
Change to a different wrapper colour whenever you want to create a new decorative band.
For a design similar to the original tree, use a gold bottom row, followed by blue, dark brown or black, and another gold section near the top.
You can also alternate colours in every row or use chocolates from a single coordinated range.
Step 11: Fill visible gaps
Stand back and examine the tree from every side.
Add extra chocolates wherever the cone remains visible. Small gaps can sometimes be concealed by adjusting the overlapping wrapper ends rather than adding another full bar.
Do not force chocolates into spaces that are too narrow, as this may damage the wrappers.
Step 12: Finish the top
Attach the final few bars close together around the narrow top of the cone.
If the cone point remains visible, cover it with matching paper, ribbon or a small piece of metallic cardstock before adding the topper.
Make sure the upper chocolates are secure and do not lean away from the cone.
Step 13: Make the star topper
Use a ready-made glitter star or cut two matching star shapes from sturdy gold cardstock.
If making your own topper, glue the two stars back-to-back with the upper point of the cone positioned between them.
Alternatively, mount the star on a wooden skewer and insert it carefully into the top of a polystyrene cone. Keep the skewer completely separate from the chocolates.
Step 14: Add the topper
Attach the star firmly to the top of the tree.
Check that it is centred and does not make the tree top-heavy. A ribbon bow may be used instead if you prefer a softer finish.
Allow any glue used on the topper to cool or dry completely.
Step 15: Prepare the tree for gifting
Place the finished tree on a sturdy cake board, tray or decorative plate.
Wrap it loosely in clear cellophane, taking care not to crush the upper rows. Gather the cellophane above the star and secure it with ribbon.
Add a gift tag listing any important allergy information.
Design Variations
Use chocolates in red, green and gold wrappers for a traditional Christmas palette.
Create an ombré tree by arranging wrappers from darkest at the base to lightest at the top.
Use one recipient’s favourite chocolate throughout the entire tree.
Alternate chocolate bars with individually wrapped lollies for a colourful mixed sweet tree.
Add narrow ribbon between the rows to imitate Christmas garland.
Use silver and blue wrappers for a winter-inspired tree.
Create a small tree for each place setting at Christmas lunch.
Gift Ideas
Give a small lolly tree to a teacher or neighbour.
Make a large version as a shared office gift.
Use the tree as an edible centrepiece for Christmas lunch.
Donate one to a school or community Christmas raffle.
Create a family movie-night version using everyone’s favourite miniature chocolates.
Make several smaller trees as handmade gifts for coworkers.
Food Safety and Storage
Use only chocolates in their original, completely sealed wrappers.
Do not pierce the wrappers with pins, staples, skewers or wire.
Apply adhesive only to the outside sealed ends of the wrappers. Never allow glue to contact the chocolate.
Store the finished tree in a cool, dry place away from sunlight, heaters and warm kitchens. Chocolate can soften or develop a white bloom when exposed to fluctuating temperatures.
Check the best-before dates before assembling the tree.
Include allergen information when giving mixed chocolates to another household. Common allergens may include milk, peanuts, tree nuts, soy, wheat and gluten.
Remove each chocolate gently by holding the wrapper close to the adhesive point. Do not pull forcefully from the centre of the bar.



Amazing going to make them as gifts for my kids teachers, this coming Christmas.
Made one of these for an early christmas party. Everyone loved it 🙂
Thanks heaps for the idea
cool
Trust me, I live in the uk and those chocolates (mars, twix, maltesers etc) they’re ALL made by Mars, both in the uk and in the rest of europe!
I plan to make several of these for each dept in the office & individual smaller ones for my few direct co-workers! I will use themes like Peanut Butter candy, chocolate candy, sugar only (non-chocolate) candy, etc. I could also make small ones for the dogs in the family, cute! 😉
Regarding the candy manufacturer, the candy used above, the maker would be cadbury, in the United Kingdom.
Uhm… I hate to be picky, but the chocolates on this project are manufactured by Mars, not Cadburys. It’s fab idea though, especially for choco-holics like myself!
this is a mad idea of a looly tree
all rightie
What a fantastic idea!
Diane
that is a brill idea!
great idea, i love it