
Get more details about this project
What you need
3.5 Inch (9 cm)
Size 8 (4 mm) Knitting Needles
Orange double worsted (8 ply) yarn
toy filling/wadding
Instructions
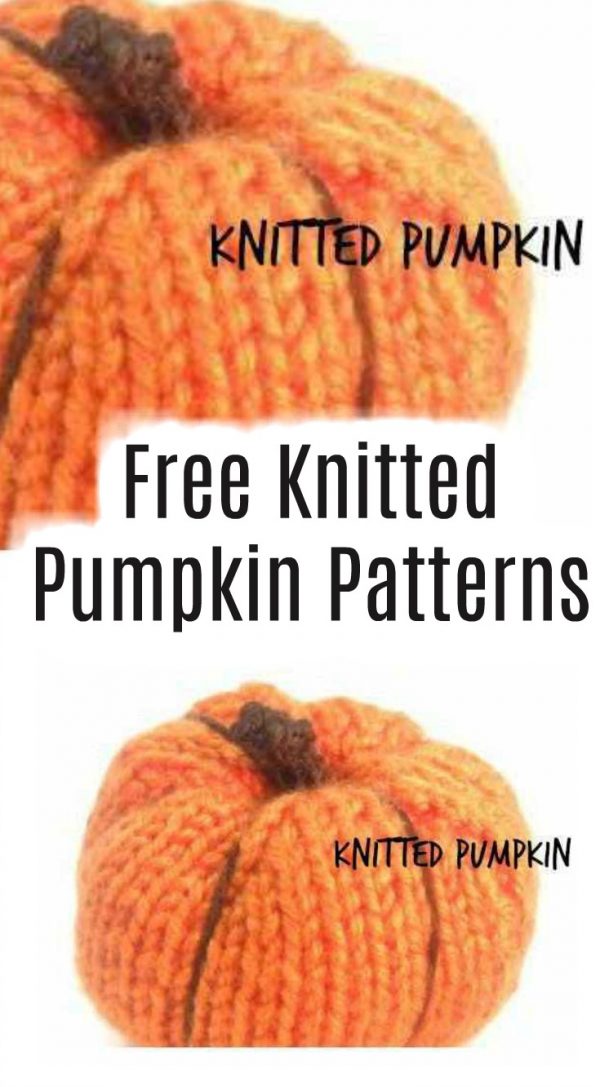
This knitting project shows you how to make an adorable pumpkin decoration which can be used for table decorations for Halloween, fall or thanksgiving parties or dinners.
Cast on 40sts
Stst 18 Rows.
Next Row -Knit 2tog k5
P1 row
Knit 2 tog k4
P1 row
Knit 2tog k 3
P1 row
Cast Off.
Sew down the side seams
Fill with wadding.
Make the pumpkin sections by attaching a piece of brown wool to the bottom of your pumpkin and bringing it up to the top on the outside and going down the centre with your needle and secure.
This needs to be done 6 more times. You need to pull the thread a little to give the section effect
To make the stork/stem cast on 6 sts.
K1 row
Cast off.
Stitch the cast on and cast off stitches together. Now attach some brown thread to one end and with a needle thread it down the middle and secure.


What weight yarn did everyone use for this project?
This was my first ever knitting project!!!! I took me about 4 hours in total, I really enjoyed making it! thanks for the pattern and thanks Zoey for the little tip for completely clueless knitters like me!
Great pattern! It really helped me to know how to make a last-minute pumpkin! 🙂
Great quick project. Easy to follow instructions and easy to make. I’ve made a pumpkin patch!
Just finished mine in time for my Mom’s b-day! She loves fall, and pumpkins. So, thanks for the free great pattern!! It knits into a really cute mini pumpkin!
I understand complaints that the pattern was confusing. For the first 18 rows you just need to alternate between a row of knitting and a row of purling (this is stockinette stitch abbreviated here as stst). For the reducing rows, just repeat the pattern, e.g., knit 2 together then knit 5, until you reach the end of the row. This will NOT work out perfectly. The stitches don’t divide up correctly so that you can complete the pattern. Just knit two together when you are supposed to and then knit the odd number of stitches at the end. It ends up being fine.
The other part that I struggled with was sewing it up because it didn’t look like much of a pumpkin after I had sewed the side seam. To sew the bottom and make it round, go in and out along the edge of cast on stitches to make a drawstring and then pull it tight. You can then sew through any remaining gaps. I kept my ends long and just used those to sew the side and the bottom. I, like Zoey, then had to cut an additional thread for the top and do the drawstring method again after I had finished stuffing the pumpkin and adding my brown yarn to make the sections.
Despite some areas of confusion, this is a very easy pattern that spares you the task of knitting in the round and makes an adorable pumpkin.
I just finished the pumpkin and even though I messed up a stitch or two I was able to hide my mistakes when I used the thread to shape it. I also had to add 1 more row of stitches to the Stst block because I started on a purl row rather then a knit row. (oops)
I only had orange crochet thread so I needed to pull the pumpkin ribs a bit tighter to make it look as cute. (mine is shaped like one of those flatter little pumpkin gourds) I made my stem 8 stitches long so it could curl over a bit more.
I don’t know if this will help any other beginners out there, or not, but I used “mattress stitch” to sew the two pumpkin seams together. I sewed the seam “right side out” with orange yarn so all the purl pumps were on the inside. You can find good videos that explain how to do “mattress stitch on Stst” if anyone doesn’t know how.
For the stem, I left really pretty long tails and threaded them both through the stuffing, and out the bottom hole that I gathered. I hooked one tail to a strong stitch and re-threaded the yarn needle with the other tail and threaded it through a different strong stitch and knotted them together securely, and used a knitting needle to stuff the trimmed tails back into the stuffing to hide it. Even though I gathered both the top and bottom, tightly with the orange yarn, I still had to stitch the stem on the top with some more orange yarn on the top to secure it a little bit better, and to hide a bit of stuffing showing through in a little gap that was bothering me.
My only other advise for beginners is when you start to do the block of 18 rows, grab a pen and paper and write down what row you’re on. I wrote down K, P, K, etc. until I had 18. This way I knew what row I was on, and what I was supposed to do next.
Thank you so so much again for this awesome little pattern!
To those who were confused about the knit 2 together rows not being “even” Just trust the pattern and keep counting. Knit the odd stitches normally at the ends of the rows. when you’re done, it works out and the decrease “lines” they make are really evenly spaced once you sew the pumpkin seams together.
Thank you so much for updating this Zoey and your detailed comment!
Mine doesnt look like a pumpkin. Its square . Help !
Just wanted to say thank you for this free pattern. I am just starting out with knitting, and needed to look up how to read the knitting recipe and some of the abrevs. but I’m half way done with it right now and it’s coming along nicely after I did that!
This is great practice doing knit and purl stitches, as well as the others to decrease the rows to make something adorable, just in time for the holidays. Thank you again!
Zoey
This pattern is not complete. First row. Knit 2 together knit 5…. Then what? It doesn’t come out even!
love it, can not wait to start.
thanks 4 sharing.
Very concise instructions makes it easy to follow pattern…thank you..going upstairs to make my Samhain Pumpkin…ok, ok, make a patch of them…lol…love simple easy to do patterns such as this..keep’um coming…..Molly
Hi, love the pumpkin, so easy to do, thanks, Jan
x
I see in the comments it says the pattern has been corrected. If it has, it doesn’t appear to be posted on this page.
I would love to make this adorable pumpkin, however the instructions are not very clear!! I think STst is stockinette stitch, but im not sure?
Next Row -Knit 2tog k5. What happens now? Repeat the K2tog k5, knit to end of row, knit to seven from end of row, or what?
Says the pattern is now fixed, but apparently not.
The pumpkin as pictured is very cute but the directions are not clear at all. Too bad.
What do you do with the last 5 stitches on the first k2tog row?
Thank you so much!!! 😀
This pattern has now been fixed. I missed out a few line breaks in the formatting and hence the confusion.
I agree with the other comment! I wanted to make this but have no idea how to read the pattern. It looks like you do the stockinette stitch for 18 rows and then maybe try following the stuff after that. These patterns need to be proof read before posting them. Please amend the pattern so “everyone” can understand it
Pattern makes no sense, but would love to see it clarified.
we looooove its cuteness but the pattern isn’t very clear to me.