
Get more details about this project
What you need
1. Self Fabric (outside): 213 yard (0.61m1 heavyweight cotton, twilL, denim etc.
2. Lining Fabric: 1/2 yard (0.46m cottons etc
3. HandLes: 14 x 8â€(35cm x 20cm) Leather, vin4 etc.
4. Scissors, thread, pins, iron, scotch tape
OPTIONAL: Serger
Pattern Pieces:
Cut:
Self Fabric: 2 Body
Lining Fabric: 2 Body
1 Bottom 1 Pocket
Handles: 4 handles (remember to cut out inside sections)
Instructions
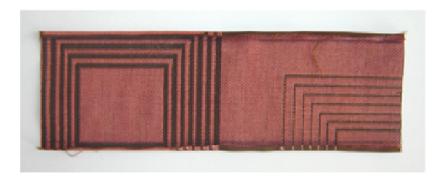
1. Cutting it Out:
Using Tote Pattern (as PDF) cut pieces from fabric. Make sure to note the quantity of each piece required to complete bag. Transfer all markings to fabric. For the Body Lining transfer the pocket markings to the right side of only one piece. Tip: I always cut straight sided pieces from vinyl or leather using a utility knife
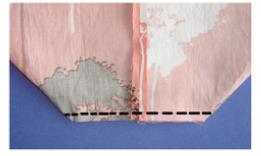
2. Prepare Bottom Piece:
Prepare the Bottom piece by folding over both of the long sides by 1/4″ (6mm). Iron flat.
With the right side together match the bottom edge of the Self Body pieces being sure to match the centre notch. Stitch with a 1/4″ (6 mm) seam allowance. Open seam and iron flat.

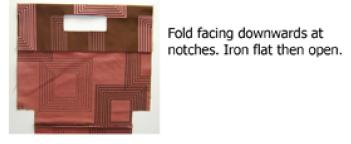
3. Preparing the facing:
Using the notches at the fold line as a guide, fold what will become the facing downwards onto the Body being sure to match handle edges (wrong sides will be together). Iron fold. Open fold.
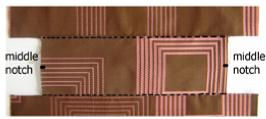
4. Attaching Bottom to Body:
Place the Bottom piece onto the right side of the Body being careful to match the middle notches. The Bottom should cover the seam joining the 2 Body pieces. Pin in place. Stitch the 2 pieces together by following closely along the edges of the Bottom (about 1/8″ (3mm) from edge).
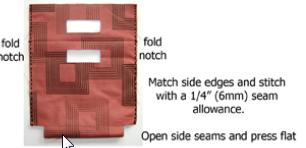
5. Body
Fold Body in half so that the right sides are together. Match fold notches and pin in place if you wish. Stitch along side edges with a 1/4″ (6mm) seam allowance. There should still be an opening at either corner of the bottom. Open side seams and iron flat.
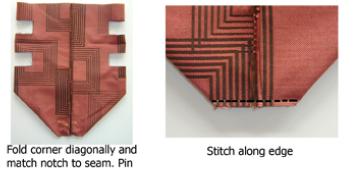
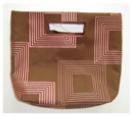
6. Closing the Corners
Fold corners diagonally and bring edges together being sure to match the middle notch to the pressed seam. Stitch along edge with a 1/4″ (6 mm) seam allowance. You should now have the basic shell of the bag.
7. The Lining Pocket:
Serge around all 4 sides of the Pocket with a serger. Fold the top edge down 1″ (2.5 cm) and iron flat. Stitch the fold closed staying close to the serged edge. Fold the remaining 3 sides under by 1/4″ (6mm) and iron flat.
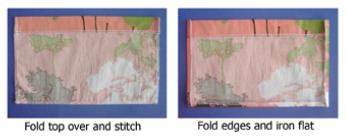
No Serger? Fold and iron the top edge of the Pocket down by 1/4″ (6mm) then fold again by 3/4″ (2cm). Stitch closed keeping close to the folded edge. Fold remaining 3 sides as above.
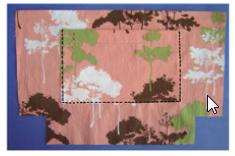
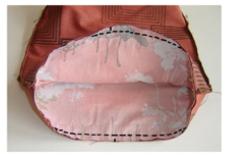
8. Attaching Pocket to Lining:
Place the Pocket over the markings on the Lining Body. The Pocket corners will overhang the markings by about 1/4″ (6mm). Stitch around sides and bottom keeping close to folded edge. Leave top open.
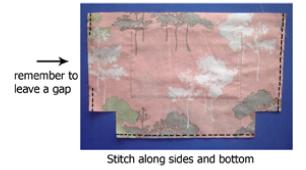
9. Lining Body:
With right sides together match the Lining Body pieces along the bottom edge. Stitch with a 1/4″ (6mm) seam allowance. Now match both sides and stitch with a 1/4″ (6mm) seam allowance. Be sure to leave a gap between the notches on one side. As with the Self Body the corners will still be open. Open side seams and press flat.
Diagonally close corners, matching the bottom seam to the side seams. Stitch with a 1/4″ (6mm) seam allowance. Turn Lining right side out.
10. Attaching the Lining to the Bag Body:
Slip the Lining inside the Bag Body matching the side seams a the top edge of the Lining with those on the facing. Pin around entire circumference. Stitch around edge with a 1/2″ (1.25cm) seam allowance.
11. Turn Right Side Out:
Turn the entire bag right side out through the opening in the Lining. Hand stitch the gap closed. Push the Lining into the Body so that the ironed folds on the Body become the top edge.
12. Preparing the Bag for the Handles:
Carefully match the edges of the cut out handle holes on the Body. Pin if you wish. With a basting stitch (the longest stitch on your machine), stitch the 2 layers together by sewing around the four sides of the handle holes about 1/8″ (3mm) from edge. Repeat with the other handle hole.

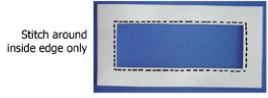
13. Preparing the Handles:
With wrong sides together, align one Handle on top of the other, carefully matching the inside seams. Stitch the 2 pieces together by sewing around the inside edge about 1/8″ (3mm) from edge. Repeat with other set of Handles. *Do NOT sew the outside edges.
TIP: If you find the handles shifting, tape them together with scotch tape. You can sew right through the tape and remove it afterwards.

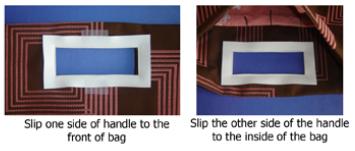
14. Attaching the Handles to the Bag:
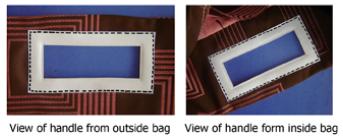
Pull Handle apart at the outside edges and slip one side of the handle to the FRONT of the bag and slip the other INSIDE the bag. The stitched edge that joins the 2 handles together should sit just to the inside of the handle hole on the Body. Maneuver the 2 layers of the Handle until they are flat and even. Tape in place if you wish. Repeat with other Handle set.
Stitch around the outside edge so that you sew through the top handle, the purse and the inside handle. Stitch approximately 1/8″ (3mm) from outside edge being careful not to shift handles. Make sure both layers of the Handle are captured in the line of stitching. Repeat with other Handle set.
Tip: If you find the vinyl/leather of the handle is sticking to your sewing machine, place a piece of paper under the handle. You can sew right through the paper and easily pull it off later.
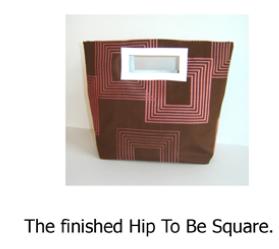
Trim any loose threads and give the tote a final press (avoid ironing handles, especially if they’re vinyl!).


I’m super excited to get started on this. I love it!
I made this for my fellow and she was like so surprised at my gift. Awesome! Thanks for your idea i can design my new one^^