
Get more details about this project
What you need
Assorted coin wrappers with crimped end
Black acrylic paint
White Glue
Black construction paper or a toilet roll
Little google eyes
Leaves gathered from outdoors (maple work well)
Sewing needle
Fishing line
Instructions
Gather leaves from your yard (maple leaves work well for the shape). Paint the leaves black, front and back. Let the paint dry. The paint shows off the veins in the leaves and looks leathery, like real bat wings.
For each bat body, paint a coin wrapper with the black acrylic paint and let dry.
When the leaves are dry, cut them so that they fit, proportionally, to each bat body.
Use glue to fasten the wings to each coin tube.
Then cut an upside-down-triangular-ish shape from black construction paper, for the head. Don’t forget the pointy little ears.
Glue small wiggle eyes onto the head and glue the head to the coin tube.
Use the stems from your leaves to create feet. Cut them into ½ inch sections. Paint them black or use a permanent marker to color them. Glue the tips of the stems up inside the tube so that they peek out like little bat feet.
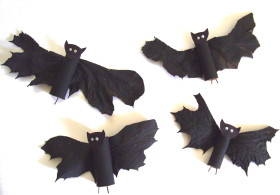
Once your bat is assembled, thread a length of fine fishing line through a sewing needle. Push the needle through the coin tube, near the top of the body, from left to right.
Now you’re ready to string up your bats by tying them to a curtain rod. Hang these creatures individually in each window, or group them, two or more to one length of fishing line, for a frightful, fluttering flock.
Have fun!


What do you think of this project? Let us know!