
Get more details about this project
What you need
Small amount of stripe fabric – 24 cm x 38 cm.
Green felt – 30 cm x 21 cm.
Red felt – 32 cm x 22 cm.
Black felt – 10 cm x 10 cm.
You will also need –
1 white pom-pom
Glue
Wire
Wadding
Decorative cord
2 black beads
Glasses
Small amount of white fur fabric.
beige stockings/tights
Instructions
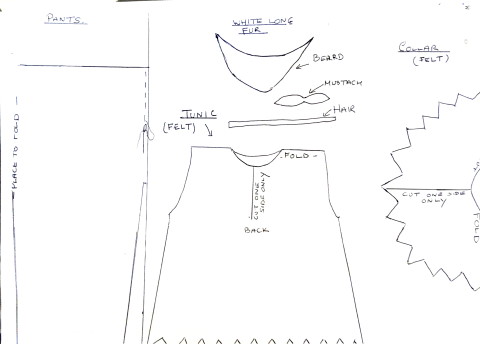
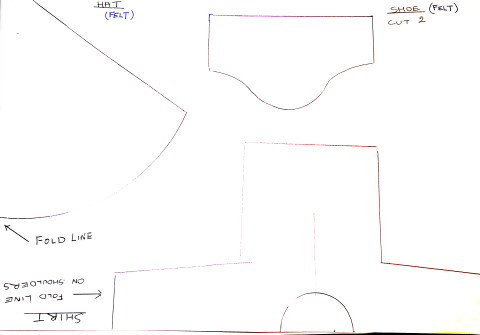
First, print these patterns:
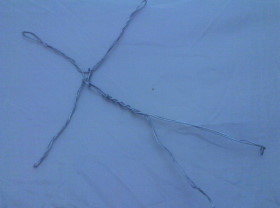
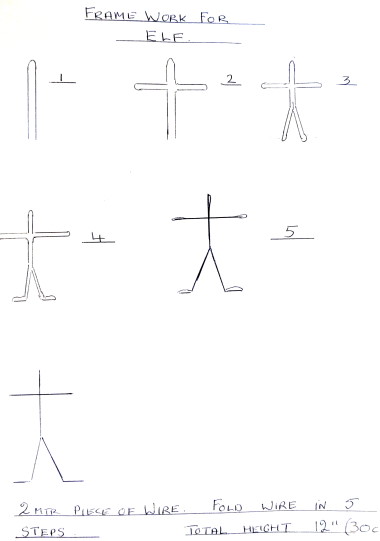
You need to make a stick man out of wire – Cut a piece of wire 2 m in length.
Use this figure to guide you on how to fold.
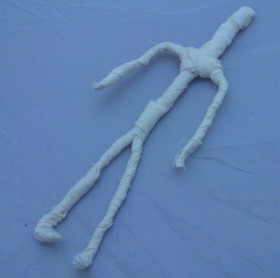
Once you are satisfied with your frame, bind him tightly with calico strips around 1 inch wide. This will make it easy to manage.
It will need about 2 m and you can do it in two pieces. It helps if you wind it up like a bandage, keep it tight as you go. This will keep it together and safe around children.
Finish off either by stitching in place, or glueing.
Now you need to bind him with a strip of wadding with the same measurements as the calico.
If you want a chubby elf you can add a little longer length and finish off around the tummy area.
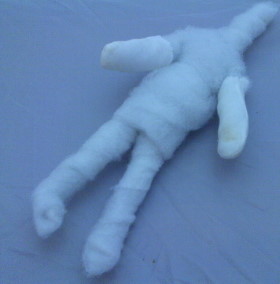
Chubby Elf
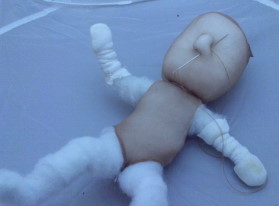
Cut two fingers off your glove and slip these over the hands and up the arms as far as they will go (if you have no white gloves you can cover with a piece of stocking – cut a square of stocking out and pull over the hands and secure with thread gathered up around the arm).
With natural colored thread stitch the fingers in with an over stitch.
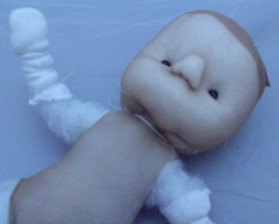
The head is done with the toe of the stocking. Cut the toe off with around 6 inches of foot.
Fill with wadding tightly to around the size of a mandarin and make a running stitch around so you can draw it up evenly. You need to maneuver the dark section of the toe to the back so it will not be seen across the forehead once you put your hat on.
If you are satisfied with the proportion of the head pull it over the knock section, gather and secure.
To make the elf face you will need a nose and eyes. Follow the directions for the face.

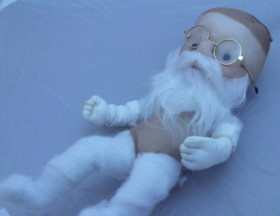
If you have trouble with the nose you can make a button nose instead. This is done with a running stitch in a circle tease. Put some wadding into the nose area before you draw it up into the button, secure, and bring your needle and thread down under the chin.
Secure again with a couple of stitches and then bring your needle and thread back up under the chin and out at the sight of your left eye thread on the black bead and then go back under the chin. Pull slightly before securing (this gives you the full cheek effect).
Repeat for the right eye.
You do not need a mouth as this will be covered by the beard.
Use your blush to give him rosy cheeks.
Now he is ready to dress!

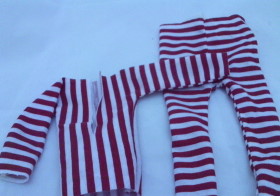
elf doll fabric
Cut out and make your clothes using the directions.
Dress him and glue on his hair and beard and finally the hat.
elf doll clothes
Tie a piece of cord around his waist.
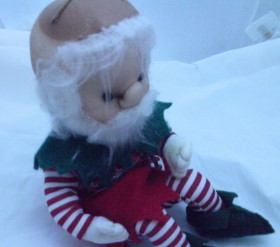
elf doll dressed
You can now bend him into what ever position you wish, hang him from your tree, sit him under the tree or make him a special gift for someone you love.
What’s an Elf without his sleigh? Sleigh Instructions can be found here: Sleigh Instructions.


Near the beginning click on Doll #1, Doll #2, Doll #3 for the patterns.
Where are the instructions for the face? I don’t know how to shape the nose.
Please help
This is the cutest littIe elf. Is it possible to get instructions for shaping the nose and the measurements for the
all the clothes? Thanks, Phyl
xxxxxxxxxxxxxxxxxxxxx Thank you for sharing your idea, I love it! Could send instruction on how to make the face of an old lady? Include eyes, nose and specially lips. I would really appreciate. Thank you…Dora
For the doll clothes it says to cut out and make the clothes following directions. Where are the directions?