
Get more details about this project
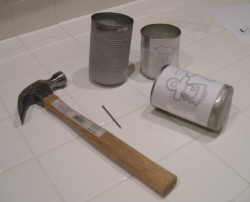
What you need
– Empty tin cans (washed and labels removed)
– Design to transfer onto can
– Hammer
– Large nail
– Tape
– Dish towel
Instructions
I chose to make luminaries for Christmas this year. You can choose any simple design to transfer onto your tin can. I used a favorite clip art program on my computer to look for easy Christmas designs to print out. I chose a Christmas tree, a snowman, and a pair of gingerbread men.
What you need
It is easiest to punch the holes in your tin can if you freeze some water in it first. Fill the can with water, leaving 1/4 inch space at the top for the ice to expand. Place in freezer until frozen. Your can may bulge a little at the bottom while in the freezer, but after you remove the ice you can use the hammer to flatten out the bottom of the can.
You might want to freeze a couple more cans then you think you’ll need in case you make a mistake and have to start over again. After the ice has frozen, take the tin can from the freezer and tape your design to the can. I used packing tape, but you can also use duct tape. The tape won’t stick to the cold can, but you can wrap the tape all the way around the can so it will stick to the paper.
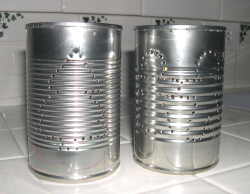
If you don’t have a design on paper, you can also draw a design on the can freehand with a permanent marker. You can also just punch the design freehand without drawing it first. Lay the can on a folded dish towel so the towel will catch the ice chips that try to escape. It will also hold the can in place. Using the hammer and nail, tap holes around the border of your design, trying to punch holes evenly and not too close together. You want a simple design so that when you see only the holes in the can you will be able to tell what it is!
After punching the holes
After punching the holes, remove the paper and tape and admire your design. It is really so easy! If you plan to hang your luminary, also punch two holes at the top of the can. You can make a handle out of wire (from a craft store) or a wire coat hanger.
Place the tin can under running warm water to melt the ice. Dry the can with a towel and place a votive candle in the bottom.
You will need a long lighter or match to light the candle.
To further decorate your tin can luminary, you can spray paint the can any color you wish. Be creative!
This is a great family project. Just make sure kids have adult supervision while using the hammer and nails. Have fun!
Rachel Paxton is a freelance writer and mom who is the author of What’s for Dinner?, an e-cookbook containing more than 250 quick easy dinner ideas. For more recipes, organizing tips, home decorating, crafts, holiday hints, and more, visit Creative Homemaking at http://www.creativehomemaking.com


Had a lot of fun making these with my niece and nephew. They’re easy to do!
Hints: using bigger nails for smaller hands makes it even easier.
To ease the fear of open fire, use battery operated candles or glowsticks.
This is a very cute idea. I’d love to try it with my daughter who is developmentally disabled.
I wonder how we could distress it or make it have an old rusty appearance.
I am thinking of doing this for my craft workshop at the resort I work at. It is an inexpensive way to make a cute country craft. Thanks for the idea!
I made one last week in Spanish class and it was so fun and awesome!
We’re going to use this project for our December family grief group.
I live in Miami, and I did it for my parties, I add two holes in the top and put a wire band to hang them from my trees with bug free candles, works Great!
This project is great for anyholiday or just for the patio in the evening. I would suggest trying other punches besides nails, a phillips screw driver makes a star shaped hole.
I’d seen these done before as a little girl, and something brought them to mind the other day. I thought you would have to own some kind of tool (metal hole puncher type thing) to make these, but as it turns out, everyone already has the materials for it! Lovely, and I will make some of these. 🙂
greatway to brighten up a room with out loosing the christmas vibe and theme of the room
I want to make 50 of these 25 for halloween and 25 for Christmas
Is the inside of the can sharp?
Easy!
perfect & easy directions. thanks.
sounds great
my two grandkids loved making these – so easy and fun
my two grandkids loved making these – so easy and fun
Very good!!! It is simple and pretty!!
Love these for outside decorations
Use the big coffee cans for larger candles and place outside for lighting your pathway. Sherry
Very pretty.
I think it is good because you achualy have the supply
I think it is great and very simple and inexpensive
well done
i think that this is so nice .i love them.