
Get more details about this project
What you need
15 Flower Life pink photobuttons with bachelor buttons, primroses, hyacinth and fringed gromwell
20gr dark purple seed beads (we used G-termann colour 6785)
2 silver plated foldover end caps
4 threads of 45cm (17.7″) beading wire or nylon thread 0.30mm (0.012″) thick
2 silver plated 5mm (0.2″) split rings
4 silver plated 4mm (0.16″) jump rings
1 silver plated toggle clasp
TOOLS
Pliers
Split eye beading needle
4 bead stoppers
Instructions
0. To string one button you will need to put the thread through one hole of the button, string 4 seed beads then put the thread through the second hole.
1. Insert the ends of four wire threads in a foldover end cap and fold down the flaps using pliers. Make sure the ends are securely fixed.
2. String the first thread: 15 cm (5.9″) seed beads, 1 button, 6 cm (2.4″) seed beads, 1 button, 8 cm (3.2″) seed beads, 1 button, 4.5cm (1.8″) seed beads, 1 button, 9cm (3.5″) seed beads. Place a bead stopper at the end of the wire thread.
3. String the second thread: 9cm (3.5″) seed beads, 1 button, 7.5cm (3″) seed beads, 1 button, 6.5cm (2.6″) seed beads, 1 button, 7cm (2.8″) seed beads, 1 button, 12.5cm (4.9″) seed beads. Place a bead stopper at the end of the wire thread.
4. String the third thread: 12cm (4.7″) seed beads, 1 button, 7cm (2.8″) seed beads, 1 button, 6.5cm (2.6″) seed beads, 1 button, 6.5cm (2.6″) seed beads, 1 button, 10cm (3.9″) seed beads. Place a bead stopper at the end of the wire thread.
5. String the fourth (last) thread: 13cm (5.1″) seed beads, 1 button, 7cm( 2.8″) seed beads, 1 button, 7.5cm (3″) seed beads, 1 button, 15.5cm (6.1″) seed beads. Place a bead stopper at the end of the wire thread.
6. Remove all bead stoppers and insert the ends of four wire threads in a foldover end cap. Fold down flaps using pliers. Make sure the ends are securely fixed. Trim excess wire.
8. Attach one split ring to each end cap. Attach one jump ring to each split ring.
9. Use the last two split rings to attach the clasp.
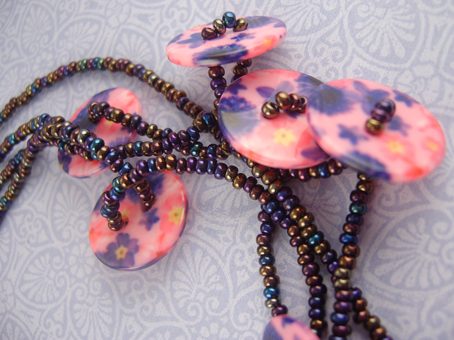
Your evening out can’t be ruined now!
This project was submitted by Photobeads.


i only got odd buttons 🙁
This is the prettiest necklace on craftbits so far keep up the work?
I just made one it’s awesome!
that is the best vintage necklace ever thnxx 🙂
That’s pretty very fancy tho
Looks fun and fairly easy. With the vintage style and look this defiantly wins me over! So Thifty.